HTML and CSS Mode Help
| Name: | HTML and CSS Mode |
| Version: | 4.1 |
| Last update: | 2020-05-30 11:17:26 |
CSS preferences
Power user
References
Known problems
License and Disclaimer
Introduction
This file documents three Alpha modes:
- HTML mode 4.1
- CSS mode 3.1
- JavaScript mode 9.1.3
HTML mode
HTML mode is for editing HyperText Markup Language (HTML)
documents and Extensible HyperText Markup Language (XHTML) documents
(suffix .html, .htm or .shtml). Whenever
you open or save a file with a name with any of these suffixes, Alpha
switches to HTML mode and inserts three menus in the menu bar:
- The first one
 is called the CSS menu and contains functions for editing Cascading
Style Sheets (CSS).
is called the CSS menu and contains functions for editing Cascading
Style Sheets (CSS).
- The second one
 is called the HTML menu
- the last one
 the HTML Utilities menu.
You can always manually switch to HTML mode with the Mode popup menu
in the toolbar of document windows.
Alpha has many different modes giving
you different features depending on which type of document you are editing.
When you edit HTML documents, make sure you are using HTML mode.
The basic idea with this HTML environment is to save you time while
typing, by providing powerful tools for editing HTML code. HTML mode can
help you to learn HTML, but it requires that you have some basic knowledge
of HTML to be useful. However, you don't have to be an HTML expert and know
every single element and every single attribute.
This manual is only a manual for Alpha's HTML, JavaScript, and CSS
modes. If you haven't used Alpha at all before I recommend that you at
least read the Quick Start before reading this manual.
JavaScript and CSS modes
In HTML mode, there is support for editing JavaScript and CSS code within
HTML documents. There is also a separate JavaScript mode for
editing JavaScript documents (suffix .js) and a CSS mode
for editing CSS documents (suffix .css). When Alpha switches to CSS
mode it inserts the CSS menu
in the menu bar. JavaScript mode does not have a menu of its own.
Note: within HTML mode the coloring of JavaScript and CSS
keywords is not enabled by default. This is because it's more convenient to
have it disabled if you are not using JavaScript or CSS. Read the Coloring
section of this manual to see what to do to enable coloring of JavaScript
and CSS keywords.
HTML mode features
- HTML mode knows HTML 5, and some of Netscape's and Microsoft's
extensions to HTML.
- Tools to easily and quickly insert HTML elements and give them
attributes.
- Many smart shortcuts for quick editing of HTML code.
- A clever word completion feature to save you time while typing.
- Customizable indentation of the code and a feature to reformat
messy code to make it more readable.
- You can open windows with lists of files from where you can easily
copy and paste to make links.
- Validation of the HTML code.
- Tools for building lists and tables.
- You can check that all links between your files are OK.
- You can move files between folders and automatically update all
links between and in them.
- Support for dynamically included files.
- Conversion of NCSA and CERN image map files to client side image
maps.
- Support for editing JavaScript code.
- Support for editing of Cascading Style Sheets (CSS).
- Uploading of complete sites with FTP.
- Files are sent to your browser with one key stroke.
- Any menu item can be attributed a keyboard shortcut.
- You can define new HTML elements. Therefore you don't have to wait
for Alpha to be updated to use it for new HTML.
- etc. etc.
Server Side Scripting
HTML mode has no specific support for server side scripting inside HTML
documents. But here are some hints to help you make the scripting cooperate
with HTML mode:
- To avoid that HTML mode reformat the scripting code and make it
unreadable and perhaps non-functional, insert formatting tags in the
document. Two different tags are available, one to prevent formatting
completely, and one for C style formatting. See the Power user section to learn how to write your own formatting tags.
- If the scripting language makes use of tags which look like HTML tags,
use the Extend menu to add these tags to HTML mode.
Getting started
This section helps you to get started using HTML mode. On this page are listed
the sections of the manual you should read first to get acquainted with
the basic features. Read the pages referred to in the various paragraphs.
First open a new window and save it with a name ending by .html.
Alpha now switches to HTML mode and inserts three new menus in the menu
bar.

The first one is called the HTML menu and the second one is
the HTML Utilities menu. The last one is called the CSS menu and contains functions for editing Cascading Style Sheets (CSS).
When you are editing HTML documents, make sure you are in HTML mode.
Alpha automatically switches to HTML mode when you open a document with any
of the suffixes .html, .htm or .shtml. You can also
manually change mode with the Mode popup found in the toolbar of the
document windows.
- Giving attributes to HTML elements
- You can obviously insert new tags in an HTML document simply by typing
them, but Alpha can help you to do it more efficiently. Alpha can let you give
values to the attributes of an HTML element in two different ways. Either
you can use traditional dialog windows, or you can let Alpha ask you to
type the attribute values in the status bar. Try both ways to see which
you like best. You find all HTML elements in the various submenus of the
HTML menu.
- How to use template stops
- If you now have inserted a couple of HTML tags you should have noticed the
black bullets (•). They are called template stops and are supposed to help
you navigate in the document. The tab key lets you jump to the next bullet
and automatically deletes it.
- Text wrapping
- It's easy to insert a pair of tags around some text. First select the
text. Then choose an HTML element from a menu and the tags are inserted
around the selection.
- Word completion
- Sometimes it's more convenient to simply type the code rather than using a
dialog window. To help you there is a clever word completion mechanism.
Type a few letters, hit
Ctrl-Tab and Alpha
tries to complete what you have typed as much as possible. This has two
advantages: it saves you key strokes and it makes sure you don't misspell
anything.
- Editing submenu
- Writing HTML code is not only a matter of inserting tags in a document. You
often want to delete tags or modify them. Many of the items in the Editing
submenu of the HTML Utilities menu makes it easier to modify the code.
- Shift-Command-double-click
- Shift-Command-double-clicking is useful for many things. For example,
Shift-command-double-clicking on a link opens that file, Shift-command-double-clicking
on an opening tag lets you change the attributes.
- Configuring HTML mode
- If you have read the sections referred to above you should have got a
feeling about the basic concepts of this HTML environment. The next thing
you should do before you go on is to give Alpha some information about
your home page. This information is needed to use HTML mode in the best
way.
- Deciding on which attributes to be asked about
- Most HTML elements have very many attributes. Therefore you can configure
which attributes to be asked about for the various elements. This is not
something you have to do immediately while you're still learning to use
HTML mode, but it is strongly recommended that you do that before beginning
to use it seriously.
There are still many things to learn, but I let you explore the rest of
HTML mode by yourself. Most parts of the manual are independent and you can
therefore read the pages basically in any order you like.
Configuring Home Pages
There are several functions in HTML mode for maintaining one or more www
sites. To be able to use these functions in the best way, you have to tell
Alpha which folder contains the files of a www site. To do this use Home Pages in the Preferences submenu of the HTML menu. The
idea is that each of those folders, together with their subfolders, should
contain all your html files at a server and be a mirror of your home page
at the corresponding server.
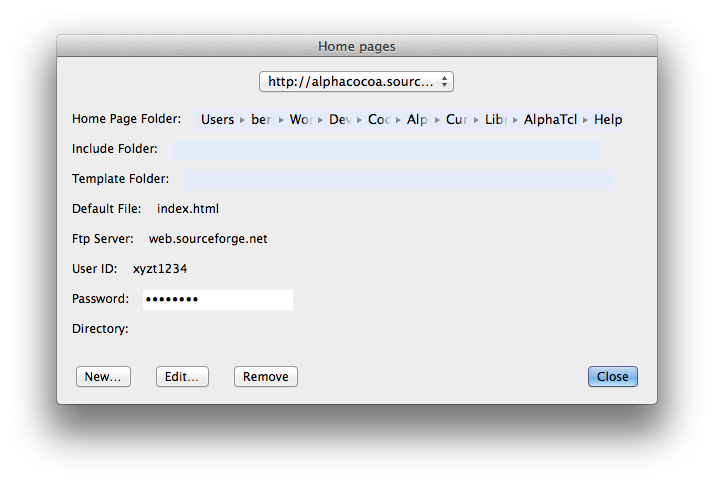
When you select Home Pages from the Preferences
menu, you are presented with a dialog window which looks like the one
above. This is actually what it looks like after you have given some
information. At first a few things are absent. In this window you have the
following:
- URLs
- a menu with all home pages you have a folder for on your disk. The rest of
the items are information related to this home page and are described in
detail below.
At the bottom there are a couple buttons:
- New
- To define a new home page folder. You are
presented with a second dialog as shown below.
- Change
- To change the home page selected in
the menu.
- Remove
- To remove the home page selected in
the menu.
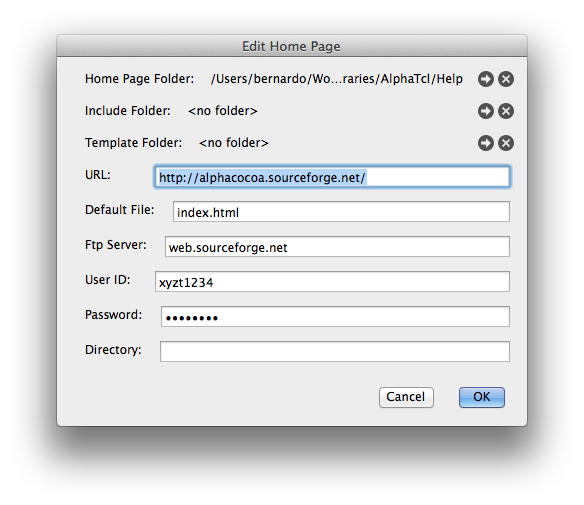
In the second dialog which appears when you click New or Change, you
can specify:
- Home Page Folder
- The folder containing all the files of your home page.
- Include Folder
- A folder where you can put your files to be dynamically included. To define
an include folder is optional and only needed if you want to use
dynamically included files. Read about dynamically included files in the
Includes section.
- Template folder
- A folder with templates to use when creating new HTML documents. To define
a template folder is optional. Read about how to use templates in the
section Creating a new document.
- URL
- The URL to your home page, for example
https://alphacocoa.sourceforge.io.
- Default file
- The file which is used if a link points to a directory. This name depends
on the configuration of your server, but is often called index.html.
- Ftp Server
- The ftp server which you upload your files to. If you specify one, you can
upload your files using the submenu FTP in the HTML Utilities menu.
- User ID
- The name of your account on the machine you upload files to.
- Password
- Your password. Note: only specify your password here if it's safe
to do so. Alpha saves the password in plain text in its preference
file. If you don't specify it here, you can enter it when you want to upload
a file.
- Directory
- The directory of your home page relative to your home directory.
The minimum information you need to provide is the Home Page Folder,
URL, and Default File. Everything else is optional.
Giving attributes to HTML elements
This section explains how you can give attributes to an HTML elements when you
insert a new one using one of the menu items for an HTML element, or when
you change an existing tag either using
Edit Tag in the
Editing submenu of the HTML Utilities menu or
shift-command-double-click a tag.
For other
features which help you modify an existing tag, see
Contextual menu,
Option-click in titlebar,
Word Completion, and
Insert Attributes in the Editing submenu.
When you insert a new HTML element using one of the menu items you
can be asked about the element's attributes in two different ways: either
in a dialog box with all attributes (the default), or in the status bar. In
the General Preferences dialog, you can select which of these two methods you want to use and you can
use different settings for when you give attributes to a new tag or when
you want to change an existing one: on page 3 of this Preferences dialog, see the
menus called "Give attributes in:" and "Change attributes in:" respectively.
Using dialog boxes
Different attributes can take different types of values (URLs, colors,
integers, for example). Below we will go through how to specify the
attribute value for the different kinds of attributes.
- URL

You can specify the URL in three ways:
- type the URL in the text box,
- choose one from the menu with your URL cache,
- select a file via a file dialog. The file you have selected will
be added to the popup menu.
Note: If you type a URL in the text box, it will be used even if you choose
something from the menu.
It is probably much faster to type the URL than selecting a file from a
file dialog, but the advantage of using the file dialog is that it will
automatically insert a correct absolute or relative URL depending on which
is appropriate. If you use a BASE tag in the current window, it will be
noticed.
Alpha calculates the URL as follows. Files inside home page folders
are mapped to a URL http://as.you.have.defined.it/file.html and files
outside the home page folders are mapped to a URL file:///path/to/file.html
Alpha first determines the URL of the two files, and then determines the
URL to link between them.
- If you link within a home page folder, you will get a relative URL.
- If you link between two different home page folders like
http://here.net/ and http://there.net/, you will get an absolute URL.
- If you link between two different home page folders like
http://www.net/~me/ and http://www.net/~you/ (at the same server), you
will get a relative URL.
You can also make links between files which are not in a home page folder,
but linking between files, where one is inside a home page folder and the
other one is not, may not always make sense.
If you select a GIF, JPEG, or PNG file for the attribute SRC of IMG via a file
dialog, the attributes WIDTH and HEIGHT are automatically determined.- Color
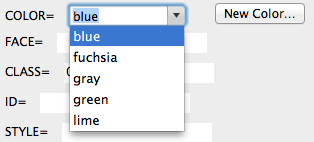
You can specify the color in three ways:
- type a hexadecimal number #RRBBGG, which defines the color, in the
text box,
- choose a color from the menu,
- define a new color. The color so defined will be added to the
popup menu.
Note: If you type something in the text box, it will be used, even if you choose
a color from the menu.
The menu contains first your own colors and then the 16 predefined colors
in HTML. See the Color Sets section about how to
define your own colors and how to group them into sets.- Target window
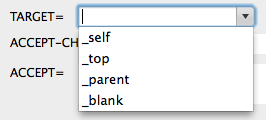
You can specify the target window in two ways:
- type the window name in the text box,
- choose a window name from the popup menu with your window cache.
- Content type
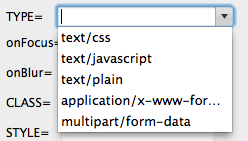
You can specify the content type in two ways:
- type the content type in the text box,
- choose one from the popup menu.
- Media descriptors, Content types, Link types

These are attributes which takes a list of values. Media descriptors and
content types should be a comma separated list, while the link types
should be space separated. You can either type the value you want directly
into the text box, or select values from the popup menu. Clicking the Add button
will add the selected item to the text box.
Note: If there is
something selected in the menu when you leave the dialog, it will
automatically be added to the attribute value. Thus if you only need one
value, it is enough to select it in the menu without having to click Add.
The values in the menu can be edited by using the commands
Content Types, Media
Descriptors, and Link Types in the
Preferences menu.- Predefined choices
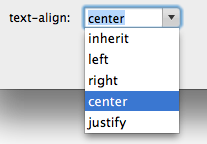
Attributes which take a value from a predefined list of choices. Select a
value from the popup menu.- Integer, Length, Multilength

Attributes which take a numerical value. Alpha will check that
it is in the valid range and that it is of the right type, e.g. if a
percentage value is allowed.- Flag

These are attributes which do not take any value. Check the corresponding
checkbox to use any of them.- Date and time
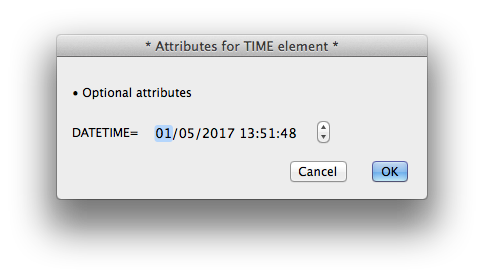
These are attributes which take a date and time in ISO format as
their value. Either specify the value or check Current time to have
Alpha insert the value of the current time.
If an element has very many attributes, the dialog box may be too small to
display them all simultaneoulsy. In that case, there will be a vertical
scroll bar.
Alpha will complain if you forget a required attribute, and in most
cases it will complain if you give a value to an attribute which is not
valid.
Using the status bar
When you use the status bar, Alpha will go through the attributes and ask
you to type a value for each of them in the status bar. During editing,
the status bar may look like one of the following images:


If you do not want to give a value to an attribute, simply type
return and the attribute is skipped. You can customize which attributes to
be asked about, see below.
By default, Alpha beeps for the first attribute it asks you about in
order to attract your attention. You can turn off the beep in the general
preferences dialog.
For each attribute you will get a prompt in the status bar. When an
attribute is optional, "(optional)" is prepended to the prompt.
When you are editing an already existing tag, the current value will be
given as a default within brackets. This value will be used if you do not
specify a new one.
Important: if you want to abort the status bar editing mode,
press the Escape key.
You can simply type the value you want for an attribute, but some keys have
special functions to speed up your work:
| Combo | Description |
| Tab | Complete |
⌘V | Paste |
⌃D | Skip attribute |
⌃F | Edit URL or Color |
⌃Q | Skip remaining attributes |
⌃Z | Erase |
| Escape | Exit |
They are explained below in greater detail.
- Tab
- If you type Tab, Alpha will look at what you have typed so far and match it
against the possible options and attempt to complete it as much as
possible. If Alpha cannot complete anything it will beep. Let us illustrate
this with an example. If you are asked about the value for the attribute
ALIGN of the P element, the possible values are LEFT, CENTER, RIGHT, and JUSTIFY. If you now type C
and then tab, Alpha will complete this for you by adding ENTER
giving the value CENTER.
Tab can be used for the following types of attributes:
- Predefined choices
- Alpha attempts to match against the list of predefined choices.
- URL
- Alpha attempts to match against your your URL cache.
- Target window
- Alpha attempts to match against your window cache.
- Color
- Alpha attempts to match against the list of color names.
- Content type(s)
- Alpha attempts to match against the list of content types. If you type a
list of content types, Alpha will attempt to complete the one after the
last comma.
- Media descriptors
- Alpha attempts to match against the list of media descriptors. If you type
a list of media descriptors, Alpha will attempt to complete the one after
the last comma.
- Link types
- Alpha attempts to match against the list of link types. If you type a list
of link types, Alpha will attempt to complete the one after the last space.
- Double Tab
- As just explained, when you type Tab, Alpha will try to complete
what you have typed as much as possible. Sometimes there are several
possible options and Alpha can only complete partially. Then if you
immediately type a second Tab, Alpha will open a window with a list
of everything that match what you have typed so far. If you choose
something from the list, Alpha will use that value and immediately jump to
ask you about the next attribute.
- Ctrl-F
- Ctrl-F (
⌃F) can be used for attributes of the
types URL and Color. If
you are asked for a URL, typing Ctrl-F will let you select a file from a
file dialog. If you are asked for a color, typing Ctrl-F will let you
define a new color from a color picker. Once you have selected a file or
defined a new color, Alpha immediately jumps to ask you about the next
attribute.
If you select a GIF, JPEG, or PNG file for the
attribute SRC of IMG via a file dialog, the attributes WIDTH and HEIGHT are automatically determined. Just hit return
for the WIDTH and HEIGHT attributes and the automatically
determined values will be used.
- Cmd-V
- Pastes the clipboard into the status bar.
- Ctrl-Q
- Skips the current and subsequent attributes. This saves you from going
through the whole list of attributes.
- Ctrl-D
- Sometimes there is a default value for an attribute. In particular when you
are changing an existing tag, the current value is given as default. This
default value is given within brackets in the prompt, like for instance:
If you type a new value, it will be used and if you just hit return without
giving a value, the default one will be used. In this case, if you do not
want any value at all and want to remove this attribute, type Ctrl-D
(⌃D) to skip this attribute.
- Ctrl-Z
- Deletes everything written.
- Escape
- Cancel everything and exit the status editing mode.
Other things to note
When you are asked about a Color attribute, you can either type a
color value #123456 or the name of one of your colors.
When you are asked about a Date and Time attribute, you can type
"now" to make Alpha use the current time as the value.
Deciding which attributes to be asked about
Most HTML elements have very many attributes. Therefore you can select
which attributes to be asked about. This allows to reduce the cluttering of
the dialog boxes or to reduce the number of attributes to be asked about in
the status bar.
There are several things which determine which attributes you are
asked about.
- The document type declaration in the file, if there is one.
Alpha recognizes HTML 5, HTML 4.0, HTML 4.01, XHTML 1.0, and XHTML 1.1 document type declarations.
- Preferences set using the menu item Attributes Globally in the Preferences
submenu of the HTML menu.
- Individual settings for each HTML element using the menu item Use Attributes in the Preferences submenu of the HTML menu.
The effect of the document type declaration will be discussed in the
section Document type declaration. Here we will
discuss the global and the individual settings for the attributes.
Individual settings
You select which attributes to be asked about for a certain HTML element
using the menu item Use Attributes in the Preferences submenu of the HTML menu. First you choose
from a list which element you want to change the settings for. In this list
'LI IN UL' and 'LI IN OL' are the LI element for
UL and OL lists respectively. 'INPUT TYPE=xxx' is
the INPUT element with the type xxx.
For each attribute you can specify one of the following:

- Always ask about
- Attributes you always want to be asked about. They always appear in the
attribute dialog box or are always prompted for in the status bar.
- Don't ask about at first
- Attributes you don't use so often but still want to be able to be asked
about.
If you use dialog boxes, the dialog box will first only contain the
attributes which you have told Alpha to Always ask about. Then
there will be a button More… in the dialog box. Clicking this
button will open a new larger dialog box which includes the attributes for
which you have told Alpha: Don't ask about at first.
If you use the status bar, you are first asked about the attributes you
have told Alpha to Always ask about. Then you are asked about the
attributes for which you have told Alpha: Don't ask about at first.
In this way you will be asked about the attributes you use most first.
Remember that you can always skip all the subsequent attributes with Ctrl-Q
(⌃Q).
- Never ask about
- Attributes you never want to be asked about. They never appear in the
attribute dialogs or are prompted for in the status bar. No attributes have
this setting by default.
Note: There is an important special case. If there are no
attributes which you always want to be asked about, the tags for the
element are immediately inserted and no dialog window is opened. This is
very convenient as there are many elements which you rarely want any
attributes for. If you occasionally want some, first insert the element and
then immediately use Edit Tag in the Editing submenu of the
HTML Utilities menu to give it attributes.
Global vs individual settings
Using the menu item Attributes Globally in the Preferences submenu of the HTML menu, the
dialog box below is opened. Here you can set some attributes
globally. These are attributes which are used by very many elements.
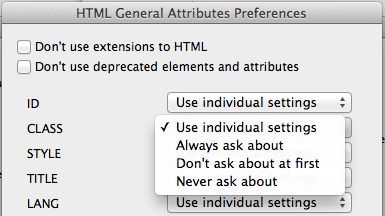
The effect of the two checkboxes at the top of the dialog window
will be discussed in the next section. We now focus on the popup menus.
Use individual settings means that the setting for each
element apply individually, i.e. there is no global setting for this
attribute. The other three options are the same as can be used for the
individual settings (as explained in the previous section). These global
settings apply to these attributes regardless of which element they belong
to.
In some cases, you would like to use a global setting for some of
these attributes, but use another setting for only a few elements. There is
then a possibility to override the global setting. If there is a global
setting, it will be shown in the individual setting which you open using Use
Attributes. Then there is a checkbox Override global setting, which
lets you use the individual setting for this attribute.

Document type declaration
A valid HTML or XHTML document has to include a document type declaration, which
specifies which version of HTML or XHTML is used in the document. There is usually
no harm in leaving it out as browsers ignore this information, but other
tools such as validators often require a document type declaration.
Alpha also uses the document type declaration to only let you use
the HTML elements and attributes belonging to the HTML or XHTML version
specified. If a document contains a document type declaration then Alpha
does the following.
- The menu items for those elements not in the HTML or XHTML version
specified are disabled.
- The attributes not in the HTML or XHTML version specified are
treated as if they belonged to the category Never ask about as
discussed in the previous section. Thus Alpha treats them as non-existing.
Alpha understands the document type declarations
for HTML 5, HTML 4.0 and 4.01 and XHTML 1.0 and 1.1 and ignores all other ones.
In HTML 5, the document type declaration has been considerably
simplified and takes the form:
<!DOCTYPE HTML>
HTML 5 (released 28 October 2014) is the current official version of HTML.
The specification for HTML 4.0 was released 18 December 1997 and HTML 4.01,
which is a small update was released 24 December 1999. The specification
for XHTML 1.0 was released 26 january 2000, and the specification for XHTML
1.1 was released 31 May 2001.
HTML 4.01 and XHTML 1.0 both specifies three document type
definitions (DTDs), which vary in the elements they support.
- Strict
- Includes all elements and attributes that have not been deprecated (see
below) or do not appear in frameset documents. For HTML documents that use
this DTD, use this document type declaration:
<!DOCTYPE HTML PUBLIC "-//W3C//DTD HTML 4.01//EN">
For XHTML documents that use this DTD, use this document type declaration:
<!DOCTYPE html PUBLIC "-//W3C//DTD XHTML 1.0 Strict//EN">
- Transitional
- Includes everything in the strict DTD plus deprecated
elements and attributes (most of which concern visual presentation such as
alignment and colors). For HTML documents that use this
DTD, use this document type declaration:
<!DOCTYPE HTML PUBLIC "-//W3C//DTD HTML 4.01 Transitional//EN">
For XHTML documents that use this DTD, use this document type declaration:
<!DOCTYPE html PUBLIC "-//W3C//DTD XHTML 1.0 Transitional//EN">
- Frameset
- Includes everything in the transitional DTD plus frames as well. For HTML
documents that use this DTD, use this document type declaration:
<!DOCTYPE HTML PUBLIC "-//W3C//DTD HTML 4.01 Frameset//EN">
For XHTML documents that use this DTD, use this document type declaration:
<!DOCTYPE html PUBLIC "-//W3C//DTD XHTML 1.0 Frameset//EN">
This document type declaration must be used and should only be used for
documents defining the frames layout, i.e. documents containing FRAMESET and
FRAME elements. For documents defining the content of the frames, use either
the strict or transitional DTD. If you want to use the attribute TARGET,
then you have to use the transitional DTD.
XHTML 1.1
XHTML 1.1 is very similar to XHTML 1.0 Strict, but has been defined to be
module-based. Its document type declaration is
<!DOCTYPE html PUBLIC "-//W3C//DTD XHTML 1.1//EN">
Deprecated elements and attributes
Some elements and attributes are defined as deprecated in the HTML 4.01 and
XHTML 1.0 specifications. A deprecated element or attribute is one that has been
outdated by newer constructs such as style sheets. Deprecated elements may
become obsolete in future versions of HTML.
The deprecated elements are APPLET, BASEFONT, CENTER, DIR, FONT, ISINDEX, MENU, S, STRIKE, and U. The deprecated attributes are mostly
the ones which concern presentation, such as alignment and colors.
Extensions to HTML 4.01
Alpha support some extensions to HTML 4.01 which were introduced by
Netscape or Microsoft. For documents with a HTML 4.01 document type
declaration these are obviously disabled. If you want to use extensions, do
not use a document type declaration in your documents. The elements which
are extensions are MULTICOL, SPACER, NOBR, WBR, MARQUEE, BLINK, BGSOUND, EMBED, NOEMBED, KEYGEN, SERVER, LAYER, ILAYER,
and NOLAYER.
Preferences related to DTDs
In the Global Attribute Preferences
dialog you can specify two preferences which are related to the DTDs.
- Don't use extensions to HTML 4.01
- HTML elements not included in HTML 4.01 will be disabled in the menu, and
attributes not included in HTML 4.01 will not be asked about. Exactly the
same set of elements and attributes are used as if the document had
included a frameset document type declaration.
- Don't use deprecated elements and attributes
- Deprecated elements will be disabled in the menu and
deprecated attributes will not be asked about (this includes the
extensions). The set of elements and attributes and those in the strict DTD
plus the ones used for frames. Use this setting when you are defining
frames documents but don't want to use deprecated elements or
attributes.
When any of these two settings apply and there is also a document type
declaration in the document, the largest set of elements and attributes
allowed both by the settings and the DTD is used.
How to use template stops
When you insert HTML elements via the HTML menu, you will see bullet
characters (•), called template stops, being inserted after the
element. These stops are supposed to be a feature. The way to use them is
the following: Suppose you want to insert a header H1. First choose
"Header 1" from the menu. In the document will now be inserted
<H1>|</H1>•
with the insertion point between the H1 tags. Now first type the header
text:
<H1>My header|</H1>•
When you have done so, hit Tab (the tabulation key) and the
insertion point will jump to the stop and delete it. You are now ready to
continue typing.
<H1>My header</H1>|
If your document has been cluttered with template stops, which you do not
want to use, you can remove them all with Shift-Ctrl-Tab. If you do
not want to use template stops at all, you can change Alpha's behavior in
the General Preferences
dialog, so that the stops are not inserted.
You can customize which key takes you to the next template stop.
This is done using the menu item Alpha ↣ Global Setup ↣ Keyboard Shortcuts ↣ Special Keys.
Both Next Stop and Next Stop Or Indent can
be used to define keys which take you to the next template stop.
Text wrapping
It is very easy to insert an HTML element in an existing text. For example,
suppose that in some text there is the word "important" which you want in
boldface. First select the word important, then choose "Bold" from
the menu (or type the equivalent key binding) and "important" will be
wrapped by the HTML tags to give
<B>important</B>
This behavior is the same for all elements which are containers. Inserting
an HTML element never deletes a selection.
Contextual menu
HTML mode defines three menu items in the contextual menu (that is to say
the menu which pops up when you control-click somewhere in a document window).
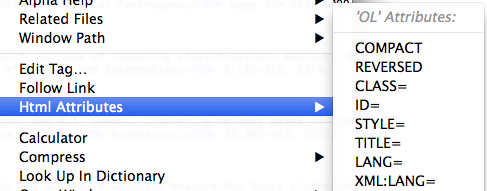
- Html Attributes
- The Html Attributes submenu lets you insert new
attributes in a tag. Note that attributes which have already been used do
not appear in the menu. In this example, we have the attributes of the FRAME
element.
Let us say you select SCROLLING= from the menu. This attribute is then inserted
into the tag with the insertion point between the quotes to let you type
the attribute's value:
<FRAME SRC="file.html" SCROLLING="|"•>
But before you type the value of the SCROLLING attribute,
control-click the tag again, and select TITLE= from the submenu.
This attribute is now inserted into the tag, but the insertion point is
still between the quotes of the SCROLLING attribute.
<FRAME SRC="file.html" SCROLLING="|" TITLE="•"•>
- Edit Tag...
- To change the attributes of the tag which you have clicked on.
This is done in the way explained in the section
Giving attributes to HTML elements, but this
time the dialog box (or status bar) contains the current attribute values
as default values.
If the element you want to change contains anything HTML mode does not
understand, a warning message will first be shown. If you decide to insert
a new tag, everything HTML mode does not understand will be removed.
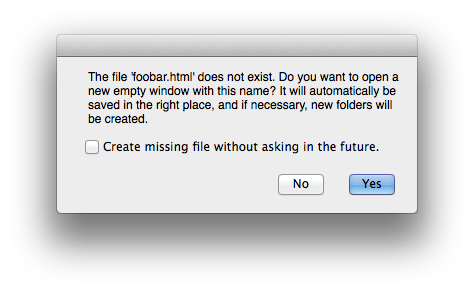
- Follow Link
- This lets you follow a link of a URL attribute.
A remote URL is opened in you web browser. A relative URL attribute opens a new window with
the file (if it exists and is a text file). If it does not exist, a
dialog box appears as the one shown below. As you see, a new empty window
can be opened with the name of the file. This window is automatically
saved in the right place, and if necessary new folders are created. Thus,
if you are making a new set of pages, you can make links to the ones you
have not written yet and then, by control-clicking, let Alpha make empty
files which are saved where you want them to be.
Following an anchor link <A HREF="#anchor"> jumps to
the corresponding <A NAME="anchor"> in the file.
Shift-Command-double-clicking
Shift-Command-double-clicking in an HTML window provides different kinds of
functionality depending on where you click.
Shift-Command-double-clicking on an opening tag
Shift-Command-double-clicking on an opening tag lets you change the attributes of
the tag. This is equivalent of using Edit Tag in the Editing menu.
However, clicking on a color or URL attribute has a special effect, see
below.
Shift-Command-double-clicking on a color attribute
Shift-Command-double-clicking on a color attribute brings up a color picker where
you can change, and optionally name, the color.
Shift-Command-double-clicking on a URL attribute
Shift-Command-double-clicking on an absolute URL sends the URL to your web
browser. This is not limited to HTML mode. It is a general feature of
Alpha.
Shift-Command-double-clicking on a relative URL attribute opens a new
window with the file if this file exists and is a text file. If it does not
exist, a dialog box appears as the one shown below. As you see, a new empty
window can be opened with the name of the file. This window is
automatically saved in the right place, and if necessary new folders are
created. Thus, if you are making a new set of pages, you can make links to
the ones you have not written yet and then, by cmd-double-clicking, let
Alpha make empty files which are saved where you want them.
Shift-Command-double-clicking on an anchor link <A HREF="#anchor">
jumps to the corresponding <A NAME="anchor"> in the file.
Shift-Command-double-clicking on a CSS URL
Shift-Command-double-clicking on a CSS URL property has the same effect as
clicking on a URL attribute.
Shift-Command-double-clicking on an include tag
Shift-Command-double-clicking on an include tag opens this include file.
Shift-Command-double-clicking in home page windows
Shift-Command-double-clicking on a file or folder in a home page window opens
the file or a new home page window with the folder. Read more in the
section about home page windows.
Controlling the layout of the code
There are three main features which let you control the layout of the code:
- the Element Layout… command in the Preferences submenu, which lets you define how you
prefer blank lines and carriage returns to be inserted around each HTML
element.
- the Indentation… command in the Preferences submenu, which lets you choose elements to
indent the content of.
- the Formatting submenu where you find functions for
reformatting the document according to your layout and indentation
preferences. With this menu you also insert special formatting tags,
which define how a section of the document should be formatted. This is
useful for example if your document contains some server side scripting
code, which you would like to have a special layout.
See the HTML Preferences panel.
Element layout preferences
Using Element Layout… in the Preferences submenu of the
HTML menu, you can specify the layout you want for each HTML element. Alpha
then uses your settings when it inserts new tags in the document, and when
it otherwise reformats the code. The possible options differ between
elements with or without a closing tag.
Elements without a closing tag
For elements without a closing tag you can specify if you always
want a carriage return inserted before and/or after the tag. If you check
both checkboxes in the dialog, Alpha will format the code like this:
    some text before the tag
    <TAG>
    some text after the tag
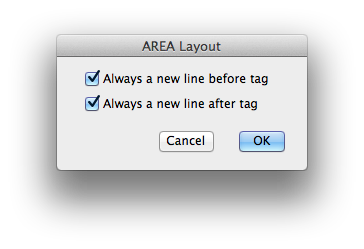
Elements with a closing tag
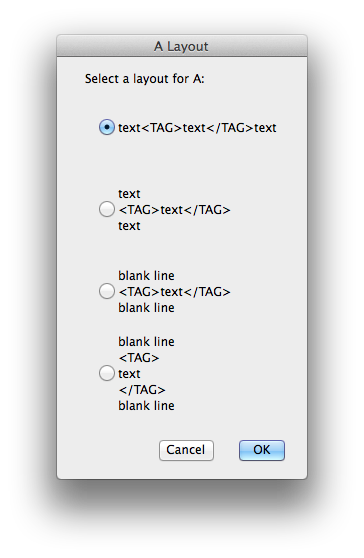
For elements with a closing tag, you have four different options
letting you specify if you want the tags to be on lines of their own and if
you want blank lines before and after them.
Click here to display the Element Layout dialogs.
- With the first option, Alpha will format the code like this:
    some text before the tag
    <TAG>text between tags</TAG>
    some text after the tag
- With the second option, Alpha will format the code like this:
    some text before the tag

    <TAG>text between tags</TAG>

    some text after the tag
- With the third option, Alpha will format the code like this:
some text before the tag
<TAG>text between tags</TAG>
some text after the tag
- With the fourth option, Alpha will format the code like this:
    some text before the tag

    <TAG>
    text between tags
    </TAG>

    some text after the tag
Indentation preferences
Alpha indents the HTML code to make easier to read. Using Indentation… in the Preferences submenu, you can choose the elements whose
content should be indented. By default, the content of lists and tables is
indented. The element which you can indent the content of are those with a
closing tag, for which you have specified the fourth layout above:
    some text before the tag

    <TAG>
    text between tags
    </TAG>

    some text after the tag
Click here to display the Indentation dialog.
Below is an example of how the code is indented. Whenever Alpha inserts
new tags in the document or otherwise reformats the code, it recognizes
your indentation preferences.
<TABLE BORDER="0" CELLSPACING="0" CELLPADDING="5">

    <TR VALIGN="TOP">
        <TH ALIGN="LEFT">ELEMENT may not have a closing tag.</TH>
        <TD>A closing tag for an element which may not have one has been
        found, like  </BR></SPAN>.</TD>
    </TR>

</TABLE>
The Formatting menu
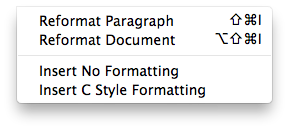
- Reformat Paragraph
- If there is a selection, the code is reformatted within the selection,
otherwise it is reformatted in the paragraph of the current position. A
paragraph is in this case defined to be everything between the nearest
blank lines.
- Reformat Document
- The same kind of reformatting applied to the entire document.
The reformatting is basically done such that the document would look as if
you had typed it from top to bottom without changing anything. The
following is performed using the following rules:
- Everything between SCRIPT, STYLE, and PRE tags as well as everything
inside comments is left untouched.
- The content of formatting tags (see below) in indented according to the
tags, but is otherwise not changed.
- Line breaks are never inserted inside attribute values. If there is
an attribute ATTR="blah blah", then "blah blah" is never broken into two
lines. This is in particular to prevent that the event handlers be broken
into two lines.
- Provided these constraints, Alpha inserts line breaks and blank lines
and indents the code according to your layout and indentation preferences,
and otherwise tries to make the lines approximately equally long.
Unfortunately reformatting of the code is rather complex and therefore not
lightning fast.
- No Formatting
- Insert formatting tags around the selected text indicating that the content
between the tags should not be reformatted at all, but be left as it is. You
can for example use this around server side scripting code, which Alpha has
no special support for. For instance:
 <!-- #NO-FORMATTING -->
some text which should left untouched
<!-- /#NO-FORMATTING -->
- C Style Formatting
- Insert formatting tags around the selected text indicating that the content
between the tags should be formatted like C code. This is the same way as both
JavaScript code and CSS code get formatted. For instance:
<!-- #C-FORMATTING -->
if (a == 17) {
    return;
}
<!-- /#C-FORMATTING -->
You can also define your own formatting tags. See the Power user section.
Word Completion
There is a clever word completion mechanism in HTML mode which saves
you keystrokes and time while typing. It also helps you make sure no
tags are misspelt.
As explained elsewhere you can use either dialog windows or the
status bar to insert new tags, but perhaps you prefer simply to type them.
Then the word completion mechanism can help you. By default word completion
is bound to Ctrl-Tab.
Tip: if you prefer another key binding than Ctrl-Tab
for word completion, you can change it using the menu item Alpha ↣ Global Setup ↣ Keyboard Shortcuts ↣ Special Keys.
How word completion works is best explained with an example. Let us
say you want to type a TABLE tag. First type
<ta
If you now hit Ctrl-Tab this is expanded to
<TABLE|>
    •
</TABLE>
•
Alpha sees that you have typed "ta" and finds that TABLE is the only HTML
element beginning by "TA" and therefore completes "TA" to "TABLE". Alpha
also automatically inserts a closing tag.
Alpha now opens an attribute dialog where you can give values to the
attributes of TABLE. This behavior is customizable. On page 2 in
the General Preferences
dialog, you can tell Alpha not to open this dialog by unchecking Open
attribute dialog after completing an element, if you prefer to type
also the attributes. Clicking Cancel in the attribute dialog leaves
the insertion point inside the opening tag, while clicking OK moves
the insertion point to the template stop between the tags. Note that the
attribute dialog is only opened if the element has any attributes, which
you have put in the category Always ask about in the Use Attributes dialog. This is the same
behavior as when you insert a template using a menu item for an element.
Let us see how you can use word completion to type the attributes. Assume
you want the attribute CELLSPACING. Type the first few letters
<TABLE ce|>
    •
</TABLE>
•
and hit Ctrl-Tab again. In this case there are two attributes beginning by
"CE", CELLSPACING and CELLPADDING. If the preference, which is somewhat
cryptically called List Pick If Mult Cmps is
checked in the dialog
Alpha ↣ Preferences ↣ Global Preferences ↣ Completions then Alpha opens
a dialog where you can choose which of the two attributes you want. Alpha
then completes "ce" to
<TABLE CELLSPACING="|"•>
    •
</TABLE>
•
You can now type the value you want for CELLSPACING, hit Tab and write the next attribute.
If List Pick If Mult Cmps is not checked, Alpha will only complete
"ce" to "CELL" as it does not know which attribute you want.
<TABLE CELL|>•
    •
</TABLE>
•
Word completion when typing attribute values
You can also use word completion to expand some attribute values. The types
for which this is possible are:
- Predefined choices
- Alpha attempts to match against the list of predefined choices.
- URL
- Alpha attempts to match against your your URL cache.
- Target window
- Alpha attempts to match against your window cache.
- Color
- Alpha attempts to match against the list of color names.
- Content type(s)
- Alpha attempts to match against the list of content types. If you type a
list of content types, Alpha will attempt to complete the one after the
last comma.
- Media descriptors
- Alpha attempts to match against the list of media descriptors. If you type
a list of media descriptors, Alpha will attempt to complete the one after
the last comma.
- Link types
- Alpha attempts to match against the list of link types. If you type a list
of link types, Alpha will attempt to complete the one after the last space.
Let us illustrate this with an example. Say you want the color "yellow" as
the value of the COLOR attribute of a FONT element. Hitting
Ctrl-Tab after you have typed
<FONT COLOR="ye|">
makes Alpha complete this to
<FONT COLOR="#FFFF00">
Word completion when editing CSS and JavaScript
Word completion can also help you when you are editing CSS and JavaScript.
See the CSS and <A HREF="javascript.html">JavaScript sections.
Electrics - automatic typing by Alpha
The term electric is used in the sense of automatic, power
assisted behavior, which is intended to save time, keystrokes, and
brainpower. All the electric features are meant to make Alpha do
automatic typing for you. HTML mode's electric preferences are set using
General in the Preferences submenu of the HTML menu.
- Electric braces
- Enabling Electric braces tells Alpha to treat the left or
right brace '{', '}' keys as special keypresses which enter the '{' or '}'
character, followed by a carriage return and then indent the following line
correctly. In HTML mode the braces are only electric inside SCRIPT and
STYLE elements. Outside SCRIPT and STYLE elements typing '{' or '}' simply
inserts a '{' or a '}'. Note: for the electric braces to
work, you must select your keyboard in the dialog
Alpha ↣ Preferences ↣ System Preferences ↣ International.
- Electric semicolon
- Enabling Electric semicolon tells Alpha to treat
the semicolon key ';' as special keypresses which enters the ';' character
followed by a carriage return and then indents the following line
correctly. The ';' key is context-dependent so you can still enter a
for( ; ; ) loop in JavaScript code without Alpha messing things up. In HTML mode
the semicolon is only electric inside SCRIPT and STYLE elements. Outside
SCRIPT and STYLE elements, typing ';' simply inserts a ';'.
- Indent on return
- Enabling Indent on return tells Alpha to indent the following
line automatically whenever you press return.
- Auto-indent when typing > of a tag
- Enabling this feature will tell Alpha to indent the current line when you
type the > of a HTML tag at the beginning of a line. This will make sure
that the code is correctly indented when you simply type the code without
using the menu items for HTML elements.
Other editing features

The Editing submenu contains many useful features
for basic editing of HTML code.
- Select Container
- Selects matching
tags which include the current position or selection. Repeated, it expands
the selection. Like the "Balance" item under the Edit menu. All tags
without a corresponding closing tag are ignored. As a simple example let us
say you have the text
- here is some text <B>blah| blah</B> some more blah
then Select Container will select
- here is some text <B>blah blah</B> some more blah
- Select in Container
- Selects the content of matching tags which include the current position or
selection. As a simple example let us again
say you have the text
- here is some text <B>blah| blah</B> some more blah
then Select in Container will select
- here is some text <B>blah blah</B> some more blah
- Select Tag
- Selects the first tag at or to the left of the current position. Repeated,
it will jump to the next tag to the left. As a simple example let us again
say you have the text
- here is some text <B>blah| blah</B> some more blah
then Select Tag will select
- here is some text <B>blah blah</B> some more blah
- Untag
- Removes a tag pair surrounding the current position or selection. All tags
without a corresponding closing tag are ignored. As a simple example let us again
say you have the text
- here is some text <B>blah| blah</B> some more blah
then Untag will remove the tags to give you
- here is some text blah| blah some more blah
- Untag and Select
- Removes a tag pair surrounding the current position or selection and
selects the content of the tag pair. All tags without a corresponding
closing tag are ignored. As a simple example let us again say you have the
text
- here is some text <B>blah| blah</B> some more blah
then Untag and Select will remove the tags and
select the text to give you
- here is some text blah blah some more blah
In this example this would be useful if you want to change the B tags to I
tags. Then you have the text selected and can easily wrap it with I tags.
- Remove Opening
- If the first tag to
the left of the current position is a tag without a corresponding closing
tag, it is removed. As a simple example let us say you have the text
- here is some text <IMG SRC="pic.gif"> blah| blah
then Remove Opening will remove the tag to give you
- here is some text blah| blah
- Edit Tag...
- To change the attributes of the tag above or to the left of the current
position. This is done in the way explained in the section
Giving attributes to HTML elements, but this
time the dialog box (or status bar) contains the current attribute values
as default values.
If the element you want to change contains anything HTML mode does not
understand, a warning message will first be shown. If you decide to insert
a new tag, everything HTML mode does not understand will be removed.
- Change Choice
- To change an attribute with predefined choices, without bringing up a
dialog box. Put the insertion point at an attribute with predefined
choices. Change Choice will then change the attribute to the next choice in
the list of choices. Use Change Choice several times to
go through the list. As a simple example <P ALIGN="CENTER"> is
changed to <P ALIGN="RIGHT"> which is changed to <P
ALIGN="LEFT"> etc.
- Reveal Color
- If you move the current position to, or select any part of, a color
attribute in the document and then choose Reveal
color, the number will be replaced with its name, and if you choose
Reveal color again, the number appears again. For
example "#0000FF" is changed to "blue" and back again. This is useful if
you want to know what a cryptic color number stands for. Do not forget
that the browser only understands the number so do not leave the name in
the document.
- Insert Attributes
- To insert new attributes in a tag at the current position. Let's say that
the current position is at a TABLE tag. If you now use Insert Attributes
a window is opened where you can pick new attributes for TABLE.
Shift-click to select the ones you want. The new attributes are now
inserted like this:
- <TABLE CELLSPACING="|" CELLPADDING="•">•
You can now type the attribute values and use tab to jump between the
attributes. The attributes are inserted exactly in the same way as when you
use the contextual menu.
- Tags to Uppercase
- Transforms all tags to uppercase. If there is a selection, the code in the
selection is transformed, otherwise the whole document is transformed.
- Tags to Lowercase
- Transforms all tags to lowercase.
- Quote All Attributes
- Puts quotes around all attribute values, changing <TAG ATTR=VAL> to <TAG ATTR="VAL">.
This is intended to be used to make the coloring work better (see the
Coloring section). If there is a selection,
this function applies to the selection, otherwise it applies to the whole
document.
- Remove Tags
- Removes all tags from the text. If there is a selection the tags are
removed in that selection, otherwise they are removed in the whole
document. If tags are removed in the whole document, the text without tags
can optionally be put in a new window.
Coloring
Coloring of your HTML code is highly customizable. You can choose the
colors you want for HTML tags, attributes, strings, JavaScript keywords,
CSS keywords, and JavaScript and CSS comments.
In the submenu Alpha ↣ Preferences ↣ Color Definitions, there are commands to get the list of all the predefined
colors available in Alpha or to declare a new color if necessary. You can
use these colors to define your own favorite colors for your HTML
documents. These colors appear in the coloring preference dialog box, where
you can choose the colors you wants for the keywords.
By default, tags are colored blue, attributes in a lighter blue
(dodgerblue), strings are colored green, comments red.
Coloring can be customized in the Coloring Preferences dialog box, which you display with the menu item
HTML ↣ Preferences ↣ Coloring.
There are a number of possibilities to customize
the coloring:
- Color of HTML tags
- The color of the HTML tags. The default is blue.
- Color of attributes
- The color of the HTML attributes. The default is dodgerblue.
- Color of strings
- The color of everything between quotes. The default is green.
- Color of HTML comments
- The color of the HTML comments enclosed between <!-- and --> tags.
The default is red.
- Color JavaScript keywords
- If checked, keywords and comments in JavaScript will be colored. These keywords also include the event handlers. By default JavaScript keywords are not colored. Coloring of JavaScript keywords is not possible if 'simple coloring' is used.
- Color of JavaScript keywords
- The color of keywords in JavaScript. Applies only if you choose to color JavaScript keywords. The default is magenta.
- Color CSS keywords
- If checked, keywords and comments in CSS will be colored. By default CSS keywords are not colored. Coloring of CSS keywords is not possible if 'simple coloring' is on.
- Color of CSS keywords
- The color of keywords in CSS. Applies only if you choose to color CSS keywords. The default is cyan.
- Color of JavaScript and CSS comments
- The color of comments in JavaScript and CSS. Applies only if you choose to color JavaScript or CSS keywords. The default is red.
You can also customize the coloring in CSS and JavaScript modes. See the
pages documenting these modes.
Functions popup

The Functions popup menu (aka 'Parse' menu) located at the top of
document windows will display an item for each header (H1-6) in
your file. You can then easily jump to a header by selecting it in the
menu.
Creating a new document - templates
In the HTML menu, there are two commands New
Document… and New with Content….
They have the same functionality with the only difference that the second
one creates a new HTML document with the content of the current window.
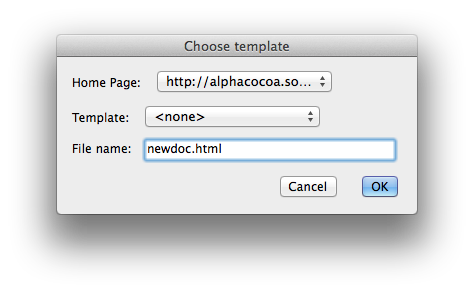
You are first asked to choose a template for the new document, and to give
the new document a name. Here is how you choose a template:
- For each home page folder, you can optionally specify a template folder containing all
templates for that home page (see the Configuring HTML mode section).
- To select the template, you have to first select the right home page in
the top popup menu.
- The second popup menu is now modified to contain the names of all
text files in the template folder of the home page you have chosen.
- Now pick a template from the second popup menu.
Note: using a template is optional.
A new window is now opened and the template is inserted. Then a second
dialog box is opened where you can:
- give the document a title,
- choose elements to insert in the documents HEAD,
- insert a document type declaration,
- specify the encoding in the XML declaration when XHTML is used.
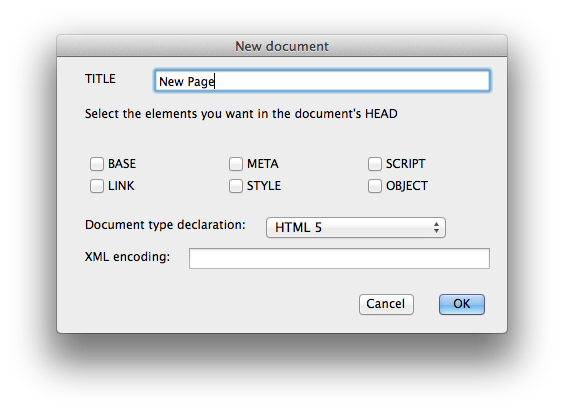
Alpha now inserts the elements HTML, HEAD, TITLE, BODY, and the ones you have checked in the dialog box into the
document asking you about attributes for them. If these elements already
appear in the template, their attributes are used as default values.
Where does the content go when using the New with Content…
command? In this case Alpha looks for the string #CONTENT# in the
template. If there is such a string, it is replaced by the content. If
there is no such string, the content is put right before the closing BODY tag.
A template example
Here is an example of what a template file might look like:
    <!DOCTYPE HTML>
    <HTML>

    <HEAD>
    <TITLE>Default title</TITLE>
    <LINK HREF="mystyle.css" REL="stylesheet">

    </HEAD>

    <BODY BACKGROUND="bg.jpg">

    #CONTENT#

    </BODY>
    </HTML>
In this example "Default title" will be used as the default for the
window's title in the above dialog box. "Bg.jpg" will be used as the
default value for the background attribute.
Tip: put template stops (•) in your templates.
Alpha will automatically jump to the first one.
Sending the window to your browser
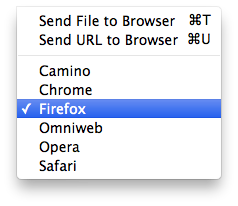
To send a document to a browser for viewing, use the Browsers menu:
- The browser currently marked in this menu is the one your documents
will be sent to when you use Browsers ↣ Send File to Browser or Browsers ↣ Send URL to Browser .
- To change browser, select the browser's menu item to mark it.
- If you want Alpha to also send the window to the
browser when you change it, press the Option (
⌥) key simultaneously.
- To send the URL to the browser automatically when you select a browser
in the menu, hold down both the Option (
⌥) and the
Shift (⇧) keys.
The other menu items in the Browsers menu are:
- Send File to Browser
- Launches your browser and sends the document to it.
- Send URL to Browser
- Launches your browser and sends the document URL to it. The URL is defined
in the Home Pages dialog. This feature is useful when you edit the
document directly on the server and the document contains server side
scripting. Note: some browsers may not reload the page if you send
the same URL several times.
You can only have one version of each browser in the menu, but you can
still send files to any version from Alpha. If any version of the browser
is running, Alpha will send the file to that one.
Paragraph utilities
The menu Blocks and Dividers contains some commands for
manipulating paragraphs.
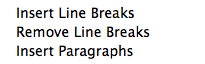
- Insert Line Breaks
- Inserts a <BR> tag at the end of each line in a selection. To use this,
first select the text where you want the <BR> tags. For example, the text
    one line of text
    another line of text
    a third line of text
will be changed to
    one line of text<BR>
    another line of text<BR>
    a third line of text<BR>
- Remove Line Breaks
- Removes all <BR> elements in a selection (not only the ones at end of
lines). To use this, first select the text where you want to remove the
<BR> tags. This is the opposite of the command above. For example, the
text
    one line of text<BR>
    another line of text<BR>
    a third line of text<BR>
will be changed to
    one line of text
    another line of text
    a third line of text
- Insert Paragraphs
- Inserts <P> elements at each empty line in a selection, and one just before
the selection. To use this, first select the text where you want the <P>
elements. For example, the text
    blah blaha
    more text

    and yet some more
    and <B>this is bold</B>
will be changed to
    <P>
    blah blaha
    more text
    </P>

    <P>
    and yet some more
    and <B>this is bold</B>
    </P>
Alpha will recognize if you have chosen not to use closing tags for the P
element and in that case will not insert any closing tags.
Creating lists
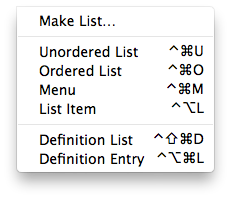
The Lists menu contains a number of commands for
creating lists.
- Make List…
- Makes a list from the text in a selection. For example, if you have a list
* item one
* item two
* item two
and a half
* item three
you can make an HTML list of them. First select the lines with the items,
before you choose Make list from the menu. You are then presented with a
dialog shown below where you can specify
- a string with which all list items must begin, in this case *. You
cannot transform a list where the items begins with 1), 2) etc. All
items must begin with the same string.
- Which kind of list you want. Choose 'None' if you don't want the
list tags to be inserted, for example if you are inserting new items in
an existing list.
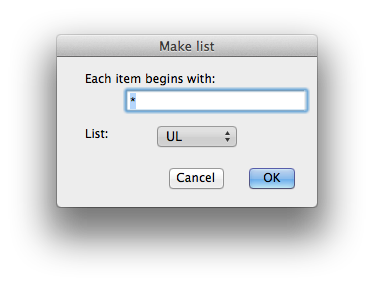
The result in this case will be
<UL>
    <LI>item one
    <LI>item two
    <LI>item two and a half
    <LI>item three
</UL>
- Unordered List, Ordered List, Directory, Menu
- Commands to create list of the types UL, OL, DIR,
and MENU respectively.
When you make a list you are first asked how many items you want
and, in some cases, if you want to be asked about attributes for each list
item. You are then asked about attributes for the list element and finally,
if you have said so, about attributes for each list item.
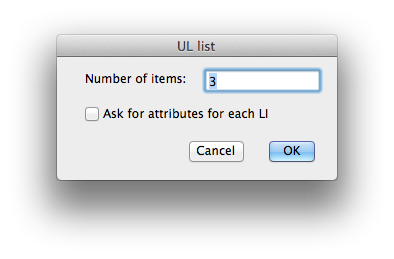
For example, choosing three list items would insert the template
<UL>
    <LI>|
    <LI>•
    <LI>•
</UL>•
If you select some text before creating the list it will be inserted as the
first list item.
- List Item
- Inserts an <LI> element. Alpha checks in which list this item will
appear and ask you about the appropriate attributes.
- Definition List
- Function to create a definition list, DL. As for the other lists,
Alpha asks you
how many items you want and then asks you about the attributes for DL, and
optionally for each DD and DT.
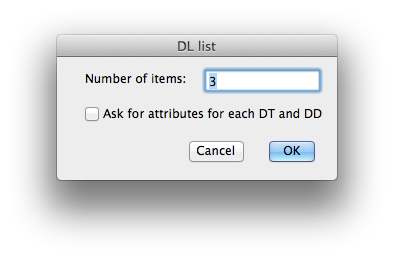
Choosing three items, you would get the following template:
<DL>
    <DT>|<DD>•
    <DT>•<DD>•
    <DT>•<DD>•
</DL>•
- Definition Entry
- Inserts a template for a new entry in a definition list.
<DT>|<DD>•
Table utilities
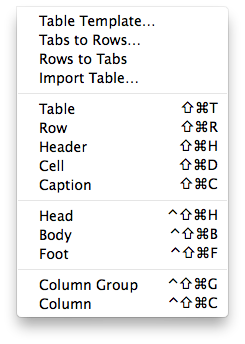
The menu Tables contains some functions for manipulating tables in
addition to menu items for inserting table related HTML elements. This section
describes the more advanced functions.
- Table Template...
- A function to easily build a table if it does
not have too complicated a structure.
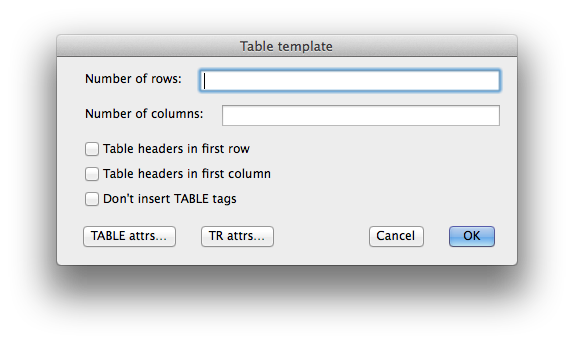
You are presented with a dialog box, as shown above, where you can specify:
- the number of rows and columns you want.
- whether you want table headers (TH) in the first row and/or the
first column. The rest will be table cells (TD).
- whether or not you want TABLE tags. Skip the table tags if you
want to insert new rows in an existing table.
- attributes for TABLE.
- attributes for TR. These attributes will be the same for every row.
You cannot use this function to build more complicated tables which
require attributes such as ROWSPAN and COLSPAN.
As an example, if you choose to create a table template with two rows and
two columns, Alpha would insert
<TABLE>

    <TR>
        <TD>|</TD>
        <TD>•</TD>
    </TR>

    <TR>
        <TD>•</TD>
        <TD>•</TD>
    </TR>

</TABLE>•
- Tabs To Rows…
- Takes a tab-delimited table and makes HTML table rows. To use this
function, first select the text to make table rows of before you choose
Tabs to Rows from the menu.
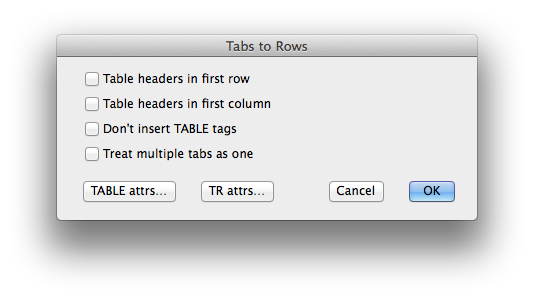
When you use this function a dialog box is first opened, as shown
above, where you can specify:
- Whether you want table headers (TH) in the first row and/or the
first column. The rest will be table cells (TD).
- Whether or not you want TABLE tags. Skip the table tags if you
want to insert new rows in an existing table.
- Whether several tabs after each other shall be treated as a single
tab or not. You can put extra tabs between the cell to obtain straight columns
and then check this option to get the HTML table you want.
- Attributes for TABLE.
- Attributes for TR. These attributes will be the same for every row.
Example: if you have the lines
a   b   c
d   e   f
in your document, Tabs to Rows… will transform them into
<TABLE>

    <TR>
        <TD>a</TD>
        <TD>b</TD>
        <TD>c</TD>
    </TR>

    <TR>
        <TD>d</TD>
        <TD>e</TD>
        <TD>f</TD>
    </TR>

</TABLE>
- Rows To Tabs
- Converts table rows in a selection to a tab-delimited format. (This is Tabs to Rows… backwards.) To use this, first select the table rows you
want to convert. This function will remove the elements TR, TH and TD, and put one tab between each table cell. Everything in
each table row will be put on one line. If the table contains cells of
varying length you may have to change the tab size for the table to look
pretty. This function does not remove the surrounding TABLE tags.
- Import Table…
- Function to import a tab delimited table from a file. This works just like
Tabs to Rows… except that the table is read from a
file rather than being selected in the document.
Image maps
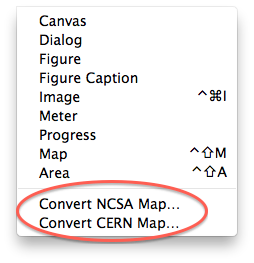
The Images menu contains two commands for
reading server side image map files and inserting the corresponding client
side image map into the document using MAP and AREA elements.
- Convert NCSA Map…
- Lets you select an image map file for the NCSA server, converts it to a
client side image map definition, and inserts it at the current position in
the document.
- Convert CERN Map…
- The same function for image map files for the CERN server.
Character entities

The Character Entities submenu can be used to insert entities for
characters, for example ü is represented by the
entity ü. All available entities are
divided into four submenus. Picking a character from any of these menus is
only useful if you only want a single character. If you write in a language
which uses a lot of these characters, type them in the document as usual
and then use the character translation.
At the top of this menu there are some most commonly used symbols
which can also be found in the submenus. They are there to be more easily
accessible. You can edit the menu using the Add… and Remove… commands to select which characters you want to be able to access like
this.
You can define key bindings for all character entities using Menu Shortcuts in the Preferences menu (see the Key bindings section).
By default the following key bindings are defined:
Shift-Ctrl-Opt-, (⌃⌥⇧,) | inserts < |
Shift-Ctrl-Opt-. (⌃⌥⇧.) | inserts > |
Shift-Ctrl-Opt-7 (⌃⌥⇧7) | inserts & |
Shift-Ctrl-Opt-Space (⌃⌥⇧-Space) | inserts |
Validating the code
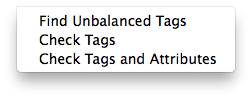
The Validate menu contains three commands for validating the
code. These three functions are of varying complexity and therefore take a
different amount of time. Unfortunately Alpha is not fast enough to
validate the HTML code instantly. Checking both tags and attributes in
large documents takes time!
If there are any errors found, a window is opened displaying all
errors. Use the Up and Down arrows to browse this window
and Return to jump to the error in the code.
Some general tips when correcting errors:
- Always try to fix the first error first. Often one error can produce
more than one error message.
- Some elements have optional closing tags, P for example. That Alpha says
there is a closing tag without a matching opening tag may be because a
closing tag has been implicitly inserted.
- The element TBODY has both optional opening
and closing tags. Therefore you may see error messages referring to TBODY
although you have no TBODY elements in your document.
- The Web Design Group has very
good documentation about in which context each element may appear.
- Find Unbalanced Tags
- This is the simplest of the three validating functions. It looks for
opening tags without a matching closing tag and vice versa. When checking,
Alpha knows which elements have optional opening tags, which have optional
closing tags and which may not have closing tags. Alpha does not check if
the elements are valid HTML elements. The possible error
messages are:
- ELEMENT may not have a closing tag.
- A closing tag for an element which may not have one has been found, like
</BR>.
- ELEMENT1 must be closed before ELEMENT2.
- A closing tag is missing, like in this case: <B><I></B>.
- Closing ELEMENT tag without a matching opening tag.
- A tag </ELEMENT> has been found with no corresponding <ELEMENT>.
- The ELEMENT tag is not an empty element tag.
- A tag of an empty element, such as <br>, has been found in an XHTML
document but the tag doesn't use the minimized syntax <br/>. (This is
strictly not an error, since <br></br> is valid in XHTML, but the minimized
form is preferred for compatibility with some browsers.)
- No element name in tag.
- Alpha could not find the element name in a tag.
- Check Tags
- A more complete
validation, and therefore more time consuming. Alpha checks all tags in the
document, but ignores the attributes.
Alpha can only validate the code according to the three HTML 4.01
document type declarations. If there is an HTML 4.0 or HTML 4.01 document
type declaration in the beginning of the document, Alpha will use it to
determine which elements are legal. Currently all document type
declarations other than HTML 4.0 and HTML 4.01 are ignored. Alpha treats
HTML 4.0 and HTML 4.01 declarations as equivalent and validates according
to HTML 4.01. If there is no document type declaration at the beginning of
the document, Alpha will make a clever guess and use either the
transitional or the frameset declaration. General error messages are:
- No element name in tag.
- Alpha could not find the element name in a tag.
- Unmatched <.
- A single < has been found.
- ELEMENT is unknown.
- An unknown HTML element not part of HTML 4.01 or XHTML 1.0 or 1.1 has been
found.
- ELEMENT may not be used with the strict DTD.
- ELEMENT is part of HTML 4.01 or XHTML 1.0 but may not be used if you use the
strict document type declaration.
- ELEMENT may mot have a closing tag.
- A closing tag for an element which may not have one has been
found, like </BR>.
- The ELEMENT tag is not an empty element tag.
- A tag of an empty element, such as <br>, has been found in an XHTML
document but the tag doesn't use the minimized syntax <br/>. (This is
strictly not an error, since <br></br> is valid in XHTML, but the minimized
form is preferred for compatibility with some browsers.)
- Closing ELEMENT tag without a matching opening tag.
- A tag </ELEMENT> has been found with no corresponding <ELEMENT>.
- ELEMENT1 must be closed before ELEMENT2.
- A closing tag is missing, like in this case: <B><I></B>.
- Text after </HTML>.
- No text may appear after the final </HTML> tag, except for comments.
- ELEMENT1 may not contain ELEMENT2.
- ELEMENT2 may not appear as a child element of ELEMENT1. For example
<TABLE><B> is invalid. TABLE may not contain B elements as child elements.
- ELEMENT may not contain text.
- Plain text has been found inside an element which may not contain text.
Example: <UL>text. UL may only contain LI elements.
- ELEMENT1 may not appear anywhere inside ELEMENT2.
- The error messages above only concern the case when an element may not be a
child element of another element. This error message tells that ELEMENT1
may not appear inside ELEMENT2 at any level of nesting. For example
<A><B><A></A></B></A> is invalid. <A> elements cannot be nested at any level.
- The ELEMENT tag must be in lowercase in XHTML.
- In XHTML all tags must be in lowercase.
In addition there are a large number of error
messages specific to an HTML element.
- Check Tags and Attributes
- The most complete validation, and therefore the most time consuming. Alpha
checks all tags in the document including the attributes. The possible
error messages are the same as when using Check Tags plus a number of error
messages for the attribute values.
Character translation

The Character Translation submenu contains commands
for translating special characters to and from their corresponding HTML
entities. If there is a selection in the document, the translation is done
in the selection, otherwise it is done in the whole document.
- åäö -> HTML
- Translates characters to HTML entities. The characters which are translated
are all that you find in the Character Entities menu except <, >,
and & and a few characters which have no Mac equivalent.
- HTML -> åäö
- Translates HTML entities to characters.
- <>& -> HTML
- Translates the characters <>& to their HTML entities.
- HTML -> <>&
- Translates them back again.
Color Sets
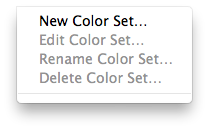
You can define and name colors to use as background, text and link color
etc. on your www pages. Later, when you insert an element with a color
attribute, you can choose the color for the attribute from a menu. A set of
16 basic colors is provided by default. These are the 16 color names
which were defined in HTML 4.0.
Predefined colors
The 16 predefined colors are shown in the following table.
| Black = "#000000" |
| Green = "#008000" |
| Silver = "#C0C0C0" |
| Lime = "#00FF00" |
| Gray = "#808080" |
| Olive = "#808000" |
| White = "#FFFFFF" |
| Yellow = "#FFFF00" |
| Maroon = "#800000" |
| Navy = "#000080" |
| Red = "#FF0000" |
| Blue = "#0000FF" |
| Purple = "#800080" |
| Teal = "#008080" |
| Fuchsia = "#FF00FF" |
| Aqua = "#00FFFF" |
Your own colors are bundled in sets which can be activated and
deactivated. Only the colors in the active sets appear in the popup menu
for the color attributes. In this way you can have different sets of colors
for different sites and only activate the ones which are needed for the
site you currently work on.
Your color sets appear at the bottom of the Colors menu. To
activate or deactivate a set, simply select it in the menu. The active ones
are the ones which are marked in the menu.
Editing color sets
To select a color set to edit use the Edit Color Set… menu item.
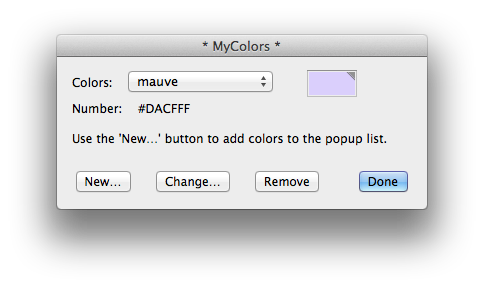
The popup menu of the dialog window shown above contains all color
names you have defined in the fileset. Below is the hexadecimal number
corresponding to the color selected in the menu.
The Color Well lets you view a color or edit it using the color
picker.
The buttons in the dialog provide the following functionality:
- New…
- To define a new color with a color picker and choose a name for it.
- Change…
- To change a color with a color picker and optionally change its name.
- Remove
- To remove the color selected in the menu.
You may also use the edit field to define a new color by specifying
its hexadecimal number in #RRGGBB format.
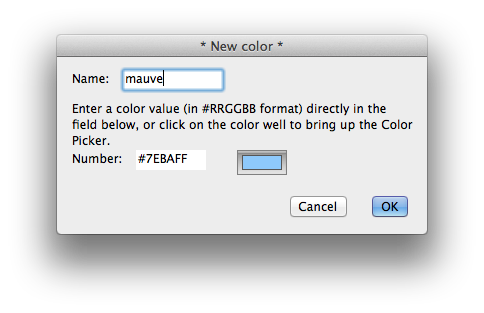
URL and frame target sets
The URLs in the popup menu in the attribute dialog, shown below, are
stored in what is called URL sets. The URLs submenu provides a
number of functions to maintain the URL sets.
Similarly Alpha saves the names of the frame targets, shown below,
in frame target sets. These are managed using the Targets menu.
Here we explain the functions in the URLs submenu. The
Targets submenu provides exactly the same functions for the frame target
sets, except that the two menu items Import and Add Folder
are only available for URL sets.
Active URL sets
In the URLs menu shown above, there are two URL sets defined, Default and My favorites, which are found at the bottom of the
menu. They are both checked, which means that they are currently active.
The URLs in the active URL sets will appear in the URL popup menu of the
attribute dialogs. Activating and deactivating URL sets is a way to only
have the URLs in the popup menu, which are relevant for the web site you
are editing currently.
Add New URLs To submenu
In the submenu Add New URLs To, you can choose which set new URLs
are added to when you enter a URL in an attribute dialog or when you bring
up an attribute dialog to edit a tag. URLs are also added to a URL set when
you paste a link from a home page window. If you select No Set, new
URLs will not be added to any set.
Editing URL sets
The URLs are stored in simple text files with one URL on each line. You
edit them as any other text file. Just remember to put exactly one URL per
line.
- Import…
- Lets you select a file and scans it to import all URLs found into a URL set.
- Add Folder…
- Adds the names of all files in a folder to a URL set. You can optionally
add a path before the file name. For example, if you have a folder pics
with images, you might want to add pics/file.gif to the set rather than
only file.gif.
Checking links
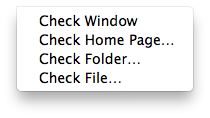
The Check Links menu contains functions to scan files and
check that all links (in HREF, SRC attributes etc.) as well as
CSS links url("...") point to files which exist. The files which are
scanned are the HTML and CSS files. For this to be useful, the files in your
home page folders must be mirrors of the files at your servers. If you use
this function as intended, you never have to worry about dead links between
your files anymore.
It works as follows: In every file scanned, Alpha looks for all link
attributes (HREF, SRC, etc.) in the file. If you use the BASE element, it will be noticed and used to determine to which URL a
link is pointing. Anything inside comments is ignored.
For each link, Alpha first determines where it is pointing. Links to
remote servers, which you do not have a home page folder for, are ignored.
Also, if you have a home page folder for http://www.net/~myplace/,
links like http://www.net/file.html are ignored, as they are
outside your home page. For all other links, Alpha checks if the file
exists.
If any invalid links are found, a window is opened where the lines
look as follows:
file.html                Line 8:   HREF="otherfile.html"
file2.html               Line 23:  (anchor missing) HREF="file.html#anchor"
folder:file3.html        Line 17:  (BASE used) SRC="pic/coolpic.gif"
In the first column is the name of the file with the link, including the
path relative to the home page folder. In the second column is the line
number where the invalid link is, and in the third column is the link
itself:
- (anchor missing) means that the file exists but that the anchor is
missing in the file.
- (BASE used) means that the file contains a BASE element.
Use the up and down arrows to select a line in this window, and
carriage return to open the file and select the line with the invalid link.
You can optionally check that the case of the links match the case
of the file names on your disk. hecking the case makes link checking slower
and is therefore not done by default. See below how to enable case
sensitive link checking.
Fixing a broken link
You can fix broken links by selecting a new one. To do this
- Browse to the line with the link you want to fix in the window with
invalid links.
- Hit Option-Return. You can now select a
new file from a file dialog.
- The link is now changed in your HTML document and it is
removed from the list of invalid links.
When the broken link contains an anchor "file.html#anchor", Alpha checks if
the new file contains that anchor. If it does, #anchor is added to the new
link, otherwise not.
Fixing a link works as long as you do not make any other changes to
the file first. Otherwise Alpha may not find the line with the broken link.
Link checking preferences
You can set some preferences for how to check links in the dialog
box Checking Links… in the Preferences menu.
Click here to display the Checking Links dialog.

- Check anchors
- When this option is checked, the commands in the Check links menu
will check that there is an anchor <A NAME="anchor"> in file.html if a link <A HREF="file.html#anchor"> points to it.
By default anchors are checked.
- Case sensitive checking (slower)
- When this option is checked, the commands in the Check links menu
will check that the case in the links match the case in the file and folder
names. Case sensitive checking is slower, and therefore not done by
default.
Includes
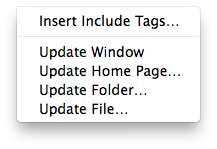
The Includes menu contains functions to dynamically include
files in your document. Let's say you have a document where one part
contains information which is updated frequently while the rest is almost
never changed. You can let the part which changes often be in another file
and insert include tags in the original document. As another
example, let's say some information is used in more than one document,
perhaps if you make two versions of your home page, one with frames and one
without. You can then have this information in a separate file and insert
include tags in the other ones. In this way you only have to make a
change at one place. You can later quickly update your files and replace
the text between the include tags.
Include tags are created using the
HTML Utils ↣ Includes ↣ Insert Include Tags…
menu item.
Including a file
Exactly how the include tags look like is explained below, but here are
some examples:
- If you have defined a Home Page Folder (via
Preferences ↣ Home Pages), the include tags
look like this:
<!-- #INCLUDE INCLPATH="myfile.html" -->
content of myfile.html will go here
<!-- /#INCLUDE -->
- Otherwise they look like:
<!-- #INCLUDE PATH="myIncludeFolder/myfile.html"-->
content of myfile.html will go here
<!-- /#INCLUDE -->
where myIncludeFolder is an absolute or relative path calculated
by ALpha when the include tag is created.
When you define a Home Page Folder (see the section Configuring Home Pages), you can also declare an Include folder for
it, where you can put all the include files. Although you can put
the include files anywhere you like, the include folder has certain
advantages when the include files contain links: when Alpha inserts the
include file, it automatically builds the relative links for you. To see
what I mean, consider the following example:
- Suppose you have a home page folder for http://www.net/
and have defined a corresponding include folder.
- Open a new file include.html in the include folder.
- Make a couple of links from include.html. Use the file
dialog and select files in the home page folder. The links will now be
like
HREF=":HOMEPAGE:somefile.html".
- Now open a new file hi.html in the home page folder.
Use Insert Include Tags and select the file include.html in the include
folder. The part :HOMEPAGE: in the links will now be replaced by the
correct relative path pointing to somefile.html.
This feature lets you include the same file in many files in different
places in the folder hierarchy, without having to worry about whether the
links are correct. Alpha takes care of that for you.
Recursive including of files is possible. You can include another
file in include.html, which in turn includes another file, which
includes another file...
A few other things:
- If you check links in include.html, Alpha will look for
files in the home page folder.
- If you shift-cmd-double-click a link in include.html, Alpha
will open the file in your home page folder.
Using place holders
The include file can contain place holders for arbitrary text - and even
scripts - which are defined by attributes of the include tags. Let us
illustrate this with an example, where we have an include file myfile.html
with the content:
My name is ##NAME##.
Here ##NAME## is the place holder and will be replaced when the
file is included in another document. A place holder begins and ends with
## and the text in between is the attribute name which will be used
in the include tag. The name is case insensitive.
An example of include tags using this include file is:
<!-- #INCLUDE INCLPATH="myfile.html" NAME="Johan" -->
My name is Johan.
<!-- /#INCLUDE -->
In this example the place holder ##NAME## was replaced by a text string. It
is also possible to use Tcl scripts. Even if you do not know Tcl or do not
plan to use scripts in the include tags, there is still one technical detail
you must be aware of. In order for Alpha to be able to always interpret
your text string as text and not as a script, some characters have to be
preceded by a \ character. These are $, [, ], and \. To illustrate this,
consider a case where the place holder ##NAME## should be replaced by
J$h[a]n\s. Then the NAME attribute must be
NAME="J\$h\[a\]n\\s"
Using scripts
As mentioned above you can also use scripts as attribute values for the
place holders. In fact, the attribute value can be a combination of text
and scripts. What Alpha does is to take the attribute value and apply the
command [subst] to it. Subst does variable,
command, and backslash substitution of its argument. To illustrate how [subst]
works, let us say you have defined a variable myname by
set myname Johan
and a Tcl proc myproc by
proc myproc {} {
    return Johan
}
then
subst $myname
returns Johan which also
subst [myproc]
does.
You can combine text, variables, and commands in any way you like in the
attribute value like in this example:
<!-- #INCLUDE INCLPATH="myfile.html" NAME="$myname and he is another [myproc]" -->
My name is Johan and he is another Johan.
<!-- /#INCLUDE -->
- Insert Include Tags…
- Asks you for a file to include, and inserts two tags inside comments. These
tags look a little different depending on where the included file is
relative to the current document. We begin with the case where there are no place
holders.
- Included file is in the include folder:
<!-- #INCLUDE INCLPATH="path to file relative to include folder" -->
content of file
<!-- /#INCLUDE -->
- Included file is somewhere else on the same disk.
<!-- #INCLUDE PATH="relative path to file" -->
content of file
<!-- /#INCLUDE -->
- Included file is on another disk.
<!-- #INCLUDE FILE="path to file" -->
content of file
<!-- /#INCLUDE -->
Depending on your preferences, the content of the
file may not be inserted until you update the window.
If the path contains any of the characters <"
>#, they are translated like this
| # | ↣ | #; |
| < | ↣ | #lt; |
| > | ↣ | #gt; |
| " | ↣ | #qt; |
in order to make the tag unambiguous.
Inserting include files with place holders
When using Insert Include Tags… to include
files with place holders, Alpha scans the file to include and opens a dialog
box where you can specify the values of the place holders.
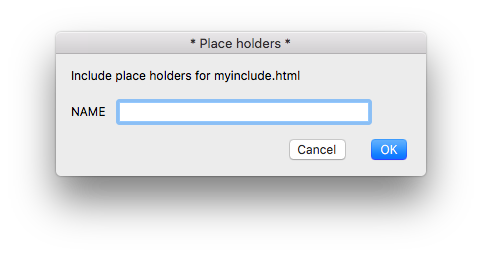
The include tags with the attributes for the place holders are then
inserted.
Updating the files
If you change the content of the included file, you can quickly
update your documents with the menu items described below:
- Update Window
- Replaces the text between all pairs of include tags with the content of
the file specified in the opening tags.
- Update Home Page…
- Replaces the text between all pairs of include tags in HTML files
in a Home Page Folder with the content of the file specified in the opening
tags. This works for files which belong to a Home Page created via Preferences ↣ Home Pages (see Configuring Home Pages).
- Update Folder…
- The same function for a folder (not necessarily corresponding to a Home
Page folder).
- Update File…
- The same function for a single file.
Note:
- If you write anything between the include tags, it is only a temporary
change. The next time you update your document everything between the tags
is replaced.
- If you remove include tags from a document, make sure you remove both the
opening tag and the corresponding closing tag.
- If a file contains last modified date tags, the date is changed if the
file has been modified.
Uploading files with FTP
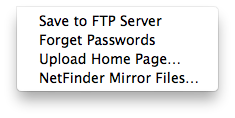
The FTP menu contains functions for uploading your home page to an
ftp server. In order to do so Alpha needs a helper application to do the
uploading. Fetch, Interarchy, and NetFinder are the
three ftp applications Alpha can talk to. <
In order to use HTML mode's ftp functions, you must provide information
about the ftp server of your home pages.
See the section Configuring Home Pages.
- Save to FTP Server
- This is the basic function for uploading files. It first saves the current
window to the disk and then uploads it to your ftp server.
If Alpha doesn't know your password you are asked for it.
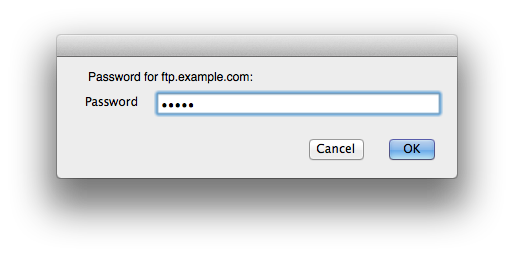
- Forget Passwords
- Makes Alpha forget all passwords, except those which you specified when you
configured HTML mode.
- Upload Home Page...
- This function lets you intelligently upload all files in a home page folder
by uploading only those which are locally modified. This function works a
little differently depending on which ftp application you use together with
Alpha.
- Uploading with Interarchy
- This works in the same way as using the FTP Mirror item in Interarchy's
File menu and choosing your home page folder as source folder. See
Interarchy's documentation for details how the mirror upload works with
Interarchy. Warning: note that Interarchy deletes remote files not
found locally.
- Uploading with Fetch
- Fetch does not have a built in mirror function and therefore uploading with
Fetch is more primitive. You have to specify yourself which files to upload
by telling it to upload those files which have been modified within a
certain period of time. When using Fetch, a dialog box is first opened asking
you about this before the upload starts.
- Uploading with NetFinder
- This works in the same way as NetFinder's built in mirror functionality,
but there are some technicalities you need to be aware of. NetFinder uses
mirror lists to do the mirroring. Therefore Alpha needs to know which
mirror list file to use when telling NetFinder to start uploading. There
are two options:
- For each home page folder, you can select a mirror list file which
contain a mirror item for this home page. Note: this
mirror list file may only contain one single item, because I have only
been able to make Alpha tell NetFinder to simultaneously mirror all
items in a mirror list.
- You can let HTML mode create a mirror list file each time you
upload. This file contains the server, user name, password, and path,
and otherwise uses the default settings that NetFinder uses when you
create a new mirror item.
Home page windows
Home page windows are windows with lists of files much in the same
way as Finder windows. The title of the window is the name of the folder.
The first line in the window is the complete path to the folder. In the
list of files the folders are shown in boldface.
The home page windows serve two purposes. They let you easily copy
and paste to create HTML links and they let you open files without leaving
Alpha or opening a file dialog.
You can navigate in the windows with the up and down arrows. You can also
make quick jumps in the windows by relatively quickly type the first few
letters of a file name. The selection then jumps to that file, just like in
the Finder.
- Key combinations with special functions in the home page windows
- cmd-shift-C
- Copies the path of the file at the current line. The line doesn't have to
be selected. Alpha grabs the file anyway. This copying does not use the
clipboard. The file can then pasted into an HTML document as a link using
Paste URL or as an include file using Paste Include
Tags.
- return
- Return on a text file opens the file in Alpha. Return on a folder opens a
new home page window with the contents of the folder (or brings it to front
if it is already open).
- cmd-downarrow
- The same as return.
- cmd-double-click
- Works like return.
- option-return
- The same functionality as return and in addition closes the current home page
window.
- cmd-option-downarrow
- The same as option-return.
- cmd-return
- Opens the parent folder of the window, or brings it to the front if it's
already open.
- cmd-uparrow
- The same as cmd-return.
- cmd-option-return
- The same as cmd-return and in addition closes the home page window.
- cmd-option-uparrow
- The same as cmd-option-return.
- cmd-R
- Refreshes the window, i.e. it removes or adds lines if you have removed or
added any files in the folder.
- Open…
- Opens a file dialog and lets you select a folder. A home page window for
this folder is then opened.
- Paste URL
- Pastes the URL which you previously have copied with Cmd-Shift-C
(
⇧⌘C) from the home page window. If the file is an
image, an IMG tag is inserted, otherwise an A tag is
inserted.
- Paste Include Tags
- Inserts include tags for the file you have previously copied from a home
page window.
- Refresh Windows
- Refreshes all open home page windows by removing or adding lines to them if
any files have been removed or added in the corresponding folders.
Extending HTML mode

You can add new HTML elements, or new attributes to existing elements, to
HTML mode. New elements will be put in a new submenu called Custom
Elements of the main HTML menu. Note that this submenu is inserted
only if there exist custom elements.
The possibility to extend HTML mode was originally developed when
HTML was continuously evolving with Netscape and Microsoft adding new
extensions to HTML. It provided a way for you to add these new elements
before HTML mode was updated. Now when HTML has stabilized the main reason
for the extendability is for the user to be able to add elements of
scripting languages, which use tags which look like HTML tags.
Your custom elements will always be available, regardless of the
document type declaration in the document or the attribute preferences. It
is assumed that you add new elements because you want to use them...
However, when validating the document all custom elements are considered as
unknown.
The Extend menu has three functions:
- New Element
- to add a new element
- Edit Element
- to add new attributes to an existing HTML element, or one you have
previously added.
- Remove Additions
- to delete a new element or to remove the new attributes you have added to
an existing element.
Adding a new element
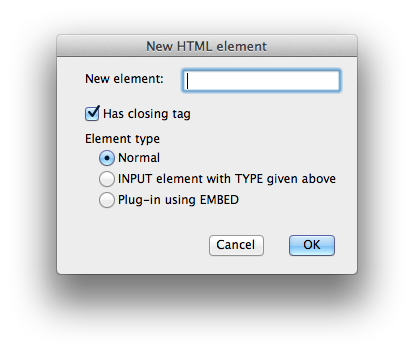
When adding a new element a dialog box is first opened where you can
specify:
- The name of the element.
- Whether the element has a closing tag or not. (Applies only if the type below
is Normal.)
- The type of the element. There are three available types:
- Normal. This is the option you would normally use.
- A new type of INPUT element. This option is here for technical and
historical reasons. In the Forms menu the INPUT
element is available for each value of the TYPE attribute.
This is because the other attributes vary depending on the value of
the TYPE attribute. Here you can add another variant of the
INPUT element, and in this case you give the value of the
TYPE attribute as the element name.
- A plug-in
using EMBED. Most plug-ins have their own specific
attributes. Here you add a new EMBED element with all these
attributes. By default all attributes of the generic EMBED
element are added.
Next you are asked to give a key binding for the new element. This dialog
box is the same as is used when changing key bindings in the menus.
Thereafter you are asked to specify the layout for the element. This
is done in the way explained in the section about element layouts.
Next a window is opened where you can specify the attributes. This
is explained in the next subsection.
Editing an element
When you are adding a new element or editing an existing one a window is
opened where you can specify the attributes.
Note: you should not edit the text in this window directly,
but only through dialog boxes and the key shortcuts described below. Direct
editing has no effect, except possibly messing things up. There is
a reason that this window is made read-only.

Above is the edit window for the IMG element, where we have already
added a new attribute MYATTRIBUTE. Each attribute is given in this window
like this:
- First we have the attribute name - a bullet to the left of the name indicates that it is
provided by HTML mode and cannot be edited.
- Then comes the attribute type.
- The text required indicates that the attribute is required.
- For attributes of the type Choices all available choices are listed
below.
- For attributes taking numerical values the minimum and maximum allowed
values are given below.
Adding a new attribute
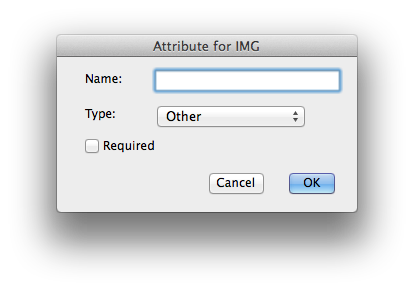
To add a new attribute type the N key. A dialog box is then opened
where you can specify:
- The attribute name.
- The attribute type.
- Whether the attribute is required or not.
The available types are:
- Flag Attributes
- which are flags and
don't take any value, like ISMAP for <IMG> or NOHREF for
<AREA>. These attributes will be checkboxes in the attribute dialog.
- URL Attributes
- which take a URL as
value, like HREF, SRC, etc.
- Color Attributes
- which take a color
as value.
- Frame Target Attributes
- which take a
target window as value, like the attribute TARGET.
- Choices Attributes
- which can only
take certain predefined choices, such as ALIGN.
- Length Attributes
- which take an
integer or percentage value.
- Integer Attributes
- which take an
integer value.
- Other Attributes
- which do not fit into any
of the other categories or can take any value.
- Content Type Attributes
- which take a content
type as value, like TYPE of STYLE.
- Content Types Attributes
- which take a comma
separated list of content
types as value.
- Event Handler Attributes
- which are
event handlers for JavaScript.
- Link Types Attributes
- which take a space
separated list of link types as value, link REL and REV of LINK.
- Multi length Attributes
- which take a length
value or a Value of the form 2*, like WIDTH of COL.
- Multi Lengths Attributes
- which take a comma
separated list of multi length values, like COLS and ROWS of FRAMESET.
- Language Code Attributes
- which take a
language code as value, like LANG.
- Character Set Attributes
- which take a
character set as value, like CHARSET.
- Character Sets Attributes
- which take a space
separated list of character sets as value, like ACCEPT-CHARSET of FORM.
- Lengths Attributes
- which take a comma separated
list of integer values, like COORDS of AREA.
- Date and Time Attributes
- which take a date
and time value on ISO format, like DATETIME of INS and DEL.
- Character Attributes
- which take a single character
as value, like ACCESSKEY.
- Media Descriptors Attributes
- which take a
comma separated list of media descriptors as value, like MEDIA of STYLE.
A few attribute types require additional information.
For attributes of the type Choices you must specify all valid
choices in a second dialog box. The choices you define will be displayed in
the dialog window as a space separated list, as shown below.
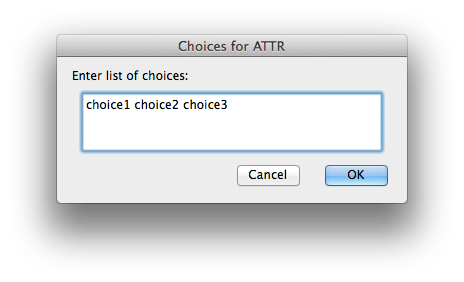
For attributes of the types Length, Integer, Multi Length, Multi Lengths, and Lengths, you must
specify the range of valid values in a second dialog box. Leave the edit
fields blank if there is no minimum or maximum value.
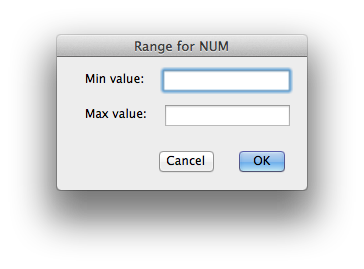
Editing and deleting attributes
To edit an attribute in order to change its name, type, and values, browse
to the attribute and hit return. You can then give it values in the same
way as when you defined a new attribute as described above.
Note;
attributes marked with a bullet cannot be modified with one exception.
You can add new choices to an attribute of type Choices.
Shift-Command-double-clicking on an attribute also lets you edit it.
To delete an attribute, browse to the attribute and type delete or
backspace. You can also select several lines and delete them all at once.
Note that attributes marked with a bullet cannot be deleted.
Saving
Once you are finished, close the window to save your changes. To cancel the
changes, hold down the Shift key (⇧) while
clicking the window's close box.
Moving and renaming files and folders

In the HTML Utilities menu there are three commands to move
and rename files and folders and automatically update all links in the
files.
- Move Files…
- Lets you move a set of files from one folder to another within a home page
folder or within an include folder.
When moving files, you are
- first asked to select the folder which contains the files
you want to move;
- then you are asked to select the files you want to move from this
folder;
- finally you are asked to select the destination folder.
- Rename File…
- Lets you rename and move a single file within a home page folder or within
an include folder.
- Rename Folder…
- Lets you rename and move a folder within a home page folder or within an
include folder.
When renaming a file or a folder, you are
- first asked to select the file or folder to rename and move;
- then you are asked to select a new name and the destination folder.
Alpha then makes the move and then asks you if you want to update
all links (this is the whole point of this function, so a 'yes' should be
appropriate, but it gives you a chance to abort the update if you have
moved the wrong files).
Alpha now updates all HTML links (in attributes like HREF,
SRC, etc.) as well as CSS links url("...") and all include
links <!-- #INCLUDE ... --> to make sure that they point at the
same files as before. This update is done in all files both in the home
page folder and the include folder.
Updating links may take a little while if you have very many files
but should in most cases be a lot faster than to make the changes manually.
Document utilities

This section documents the last three commands of the HTML Utilities menu.
- Last Modified…
- Adds tags to the document which makes it possible to automatically update
the date and time when the document is saved. Two tags inside HTML comments
are inserted:
<!-- #LASTMODIFIED TEXT="some text" FORM="date format" LANG="language"-->
some text and date
<!-- /#LASTMODIFIED -->
Whenever the document is saved the date is updated. Do not write anything
between the comment tags. It will be removed when the document is saved.
Character translation is done automatically for the text and the date.
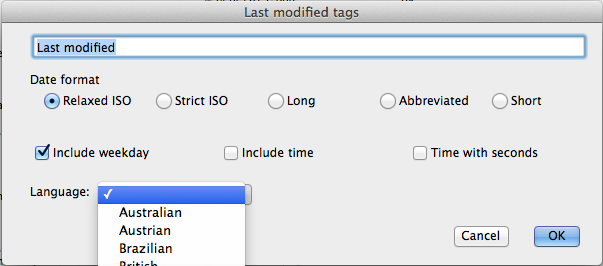
When you use Last Modified… in the HTML Utilities
menu a dialog box is opened where you can specify:
- the text before the date (Default: Last modified). You can change the
default text in the General Preferences dialog box.
- the date format, relaxed ISO, strict ISO, long, abbreviated or short.
Relaxed and strict ISO are universal while the other three formats are
language dependent. (We here show the U.S. format.)
- Relaxed ISO 2001-01-14 15:07
- Strict ISO 2001-01-14T15:07:18+01:00
- Long Sunday, January 14, 2001 3:07 PM
- Abbreviated Sun, Jan 14, 2001 3:07 PM
- Short 1/14/01 3:07 PM
- if the weekday should be included in the date. It applies to the Long
and Abbreviated formats.
- if the time should be included in the date. It applies to all except the
Strict ISO format.
- if the time should be given in seconds. It applies to all except the
Strict ISO format.
- the language of the date format. It applies to the Long, Abbreviated, and
Short formats. If no language is specified, the format in the Date and
Time control panel is used.
Note: The short time format can be confusing. For example 4/5/66
means 4 May 1966 in some parts of the world and April 5, 1966 in other parts.
- Document Type…
- Inserts a document type declaration at the top of the document. If there
is one already, it is replaced.
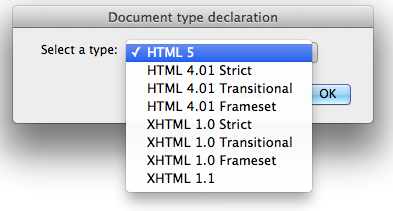
- Document index…
- Makes an index of the document with an item for each header H1-6. If there
already exists an index in the document, it is replaced, otherwise a new
one is inserted at the current position.
The index can be done using either PRE or an UL list. When
Alpha makes the index, it goes through the window and looks for all
headers. If there is an anchor <A NAME="..."> inside a header that
anchor is used when building the index, otherwise an anchor is inserted
inside the header. Alpha then inserts
<!-- #DOCINDEX TYPE="PRE,3" DEPTH="6" -->
the index
<!-- /#DOCINDEX -->
The index consists of a list with links to the various headers.
Key bindings
One of Alpha's features is that you can define a key binding for
almost everything. In HTML mode and CSS mode there is an easy way to add key
bindings to the menu items and to change or remove the existing key
bindings.
To modify the key bindings in the HTML menu and HTML Utilities menu
choose Menu Shortcuts... in the Preferences submenu of the
HTML menu. To modify the key bindings in the CSS menu use Menu Shortcuts...
in the CSS menu.
First a window with a list of all submenus is opened where you pick
the menu you want to redefine. In this list, main menus are called HTML,
Utilities and CSS. Let us for example choose the menu Lists.

First a window is opened, as shown above, with the current key
bindings.
Beside each menu item, or pair of menu items for dynamic ones, is a
button with a right arrow. Clicking such a button opens another window
where you can change the binding. For example, clicking the arrow beside
List Item opens the following window

To define a binding either select 'Normal key' in the popup menu and
type a character in the text box, or choose one of the special keys in the
popup menu. Then choose which of the modifiers Shift, Control, Option, and Command you want.
To remove a binding select <No binding> in the popup menu.
Key bindings for character entities
It is also possible to define key bindings for the character entities found
in the submenus of the Character entities menu. The advantage with
this is that you can bind the entities to any key you like including
accented characters. Some bindings are defined by default (see the Character entities section).
To change the key bindings for the character entities use the menu
item Menu Shortcuts in the Preferences menu and select any of
the four menus Small Chars, Capital Chars, Other Chars
1, or Other Chars 2.
The key bindings dialog for the entities have more options including
the possibility of adding a prefix in the binding.
Preferences
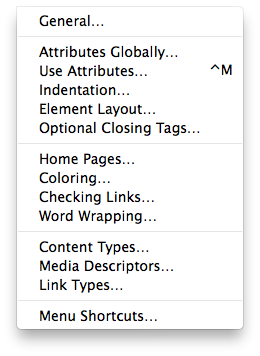
HTML mode is highly customizable. You can modify its behavior in
several ways. This section describes all settings you can do using the
Preferences menu of the HTML menu.
General Dialog
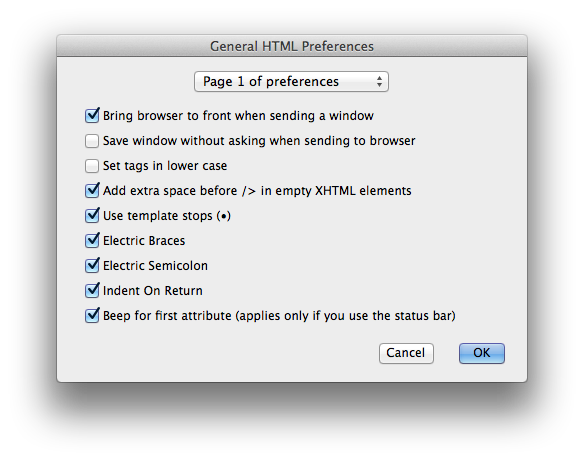
- Bring browser to front when sending a window to it
- If checked, when you send a file to the browser, the browser will be
brought to the foreground. If you have lots of screen space and are just
validating, uncheck this flag to leave the browser in the background and
Alpha in the foreground. By default the browser is brought to the
foreground.
- Save window without asking when sending it to the browser
- If checked, when you send a file to the browser, the window is saved
automatically without asking you. By default you are asked if you want to
save the window.
- Set tags in lower case
- If not checked, elements will be like <P>; if checked, like <p>. By default
upper case is used in HTML. In XHTML lowercase is required.
- Add extra space before /> in empty XHTML elements
- If checked, elements such as <br/> will get an extra space before />, like
<br /> in XHTML. This for better compatibility with some browsers.
- Use template stops (•)
- If checked, will insert the • characters. By default the • characters are
inserted.
- Electric Braces, Electric Semicolon, Indent On Return
- See the section Electrics - automatic typing by Alpha.
- Give attributes in dialog boxes/status bar
- To choose whether you want to use dialog boxes or the status bar when you
give attributes to an HTML element. By default dialog boxes are used.
- Change attributes in dialog boxes/status bar
- To choose whether you want to use dialog boxes or the status bar when you
change the attributes in an existing HTML element by using Edit Tag
in the Editing menu or by shift-command-double clicking on an opening
tag. By default dialog boxes are used.
- Beep for first attribute (applies only if you use the status bar)
- If checked, and you input element attributes from the status bar, Alpha
will beep when asking for element attribute information there. By default
Alpha will beep. This applies only if you use the status bar.
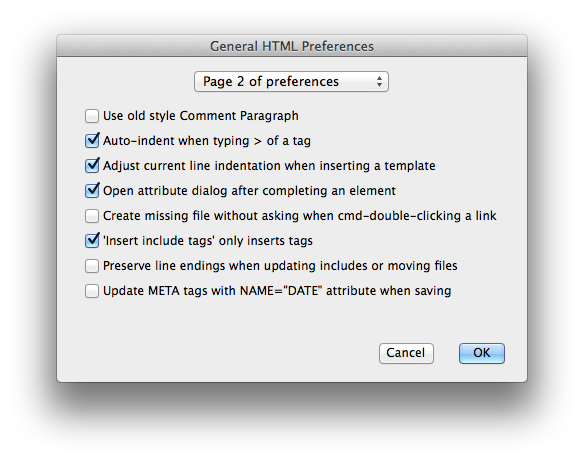
- Use old style Comment Paragraph
- In HTML mode 3.0 I made a change in (Un)Comment Paragraph, which made
Uncomment Paragraph incompatible with comments created by Comment Paragraph
in older versions of HTML mode. If you have old paragraph comments, enable
this preference to ignore the change in (Un)Comment Paragraph.
- Spell Check Comments
- This option indicates if spell checking should apply to comments. This
setting is only supported by Alpha's internal spell checker. By default, it
is enabled.
- Spell Check HEAD
- This option indicates if spell checking should also apply to the HEAD
section of the document. This setting is only supported by Alpha's
internal spell checker. By default, it is disabled.
- Auto-indent when typing > of a tag
- See the section Electrics - automatic typing by Alpha.
- Adjust current line indentation when inserting a template
- If this preference is enabled, Alpha adjusts the indentation of the current
line when inserting a template at the beginning of the line. This applies
both when you insert a template using a menu item and when you use word
completion. This behavior helps you making sure the code is indented
according to your preferences. By default Alpha adjusts the indentation.
- Open attribute dialog after completing an element
- When checked Alpha will open an attribute dialog - or ask you for the
attributes in the status bar - when you uniquely word complete an opening
element tag <ELEM to a template including a closing tag. Uncheck if you
prefer to type the attributes too, and do not want the dialog.
- Create missing file without asking when shift-command-double-clicking a link
- If checked and you shift-command-double-click a link pointing to a file which does
not exist, Alpha will create an empty file and open it without first asking
you if you want to create the file. By default you are asked before the
file is created.
- 'Insert include tags' only insert tags
- If checked, Alpha will only insert the include tags when you use 'Insert
include tags', and not insert the file to be included until you update the
window. By default only the tags are inserted.
- Preserve line endings when updating includes or moving files
- If checked, Alpha will make sure the type of line endings used in each file
- Mac, Windows, or Unix - is preserved when updating files with include
tags or when moving files. By default line endings are not preserved,
because this slightly slows down the updating.
- Update META tags with NAME="DATE" attributes when saving
- If checked, HTML mode will look for tags like <META CONTENT="2001-01-14"
NAME="DATE"> in the document every time you are saving and update the date.
By default this is not done.
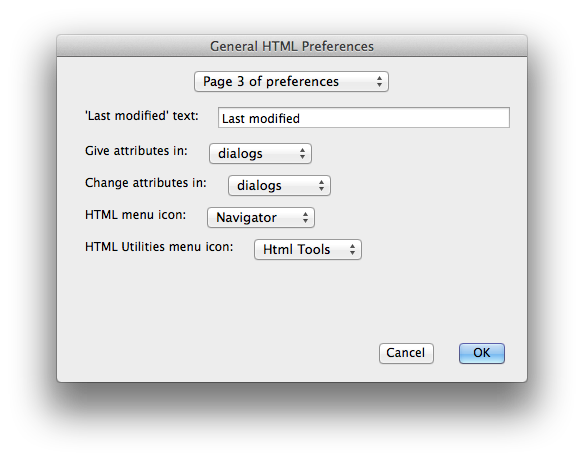
- 'Last modified' text
- The default text when you insert last modified tags.
- HTML menu icon
- The icon for the HTML menu.
- HTML Utilities menu icon
- The icon for the HTML Utilities menu.
Attributes Globally Dialog
See the section
Deciding which attributes to be asked about
or display the
Attributes Globally Preferences
dialog.
Use Attributes Dialog
See the section
Deciding which attributes to be asked about or
display the Use Attributes Preferences dialog.
Indentation Dialog
See the section Indentation preferences or display
the Indentation Preferences
dialog.
Layout Dialog
See the section
Controlling the layout of the code
or display the
Element Layout Preferences dialog.
Optional Closing Tags Dialog
Lets you specify if you want to use the closing tag of those elements which
have an optional closing tag.
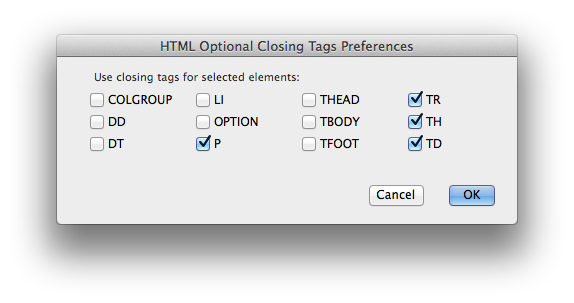
Home Pages Dialog
See the section Configuring Home Pages.
Menu Shortcuts Dialog
See the section Key bindings.
Coloring Dialog
See the section Coloring.
Checking Links Dialog
See the section Checking links.
Word Wrapping
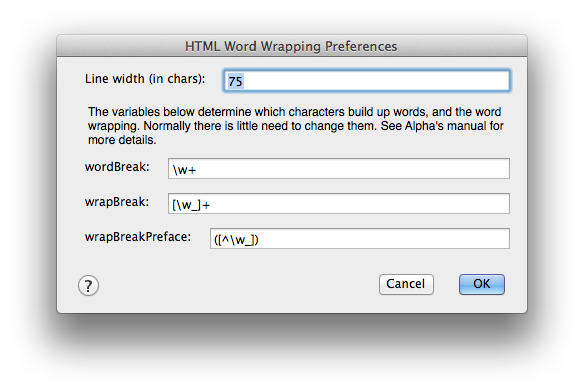
- Line width
- Determines at which position lines are wrapped. This is the HTML mode
specific version of the variable Fill Column in the global settings dialog
Alpha ↣ Preferences ↣ Global Preferences ↣ Text.
- wordBreak
- This controls which characters build up words,
- wrapBreak, wrapBreakPreface
- These preferences control word wrapping.
Read about them in the general manual if you want to change them (should
usually not be needed).
Content Types, Media Descriptors, Link Types Dialogs
To edit the list of content types, media descriptors, and link types, which
appear in the popup menus of the attribute dialog boxes. A dialog is opened
where you can edit these list. Separate each item in the list with a space.
Any item containing spaces must be surrounded by quotes.
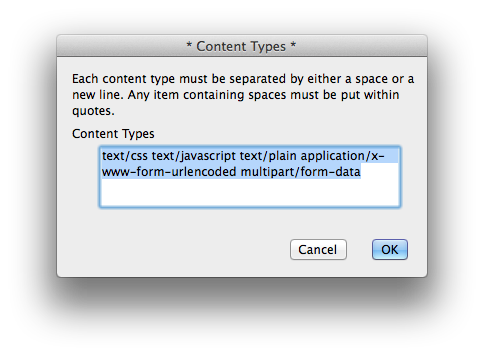
JavaScript mode
JavaScript mode is intended for editing of external JavaScript documents
(suffix .js). It may also sometimes be a better choice when you are
editing JavaScript inside an HTML document. Select JavaScript in the mode
menu of your document window to manually switch to JavaScript mode.
See the JavaScript mode help.
JavaScript mode provides keyword coloring, word completion, and the
basic editing features, like indent on return, electric semicolon, electric
braces, and special indent for case label.
Word completion
In JavaScript mode, completions of a number of statements are available:
function, for, while, switch, case,
do, if, and else. Typing Ctrl-Tab (which is
the key combo to trigger completion) after typing any of these statements
expands them to a template. Two examples:
Typing
for
and then typing Ctrl-Tab gives
for (|; •; •) {
    •
}
•
Typing
while
and then typing Ctrl-Tab gives
while (|){
    •
}
•
Parse menu
The Parse popup menu of the document window lists all functions defined in
the document. Selecting a function in the menu lets you jump to it.
Shift-Command-double-clicking
Shift-Command-double-clicking on a keyword or builtin property or function makes
Alpha jump to a JavaScript reference guide. This requires that you install
the JavaScript reference for Alpha by Wolfgang Haeuptli.
Shift-Command-double-clicking also works in HTML mode.
Preferences
The JavaScript preferences dialog is opened using the menu item
Alpha ↣ JavaScript Mode Setup ↣ Mode Preferences….
- Electric braces
- Enabling Electric braces tells Alpha to treat the left or right brace '{',
'}' keys as special keypresses which enter the '{' or '}' character,
followed by a carriage return and then indent the following line correctly.
Note: for the electric braces to work you must select your keyboard in the
dialog Alpha ↣ Preferences ↣ System Preferences ↣ International.
- Electric semicolon
- Enabling Electric semicolon tells Alpha to treat the semicolon key ';' as
special keypresses which enters the ';' character followed by a carriage
return and then indents the following line correctly. The ';' key is
context-dependent so you can still enter a
for( ; ; ) loop in JavaScript
code without Alpha messing things up.
- Indent on return
- Enabling Indent on return tells Alpha to indent the following line
automatically whenever you press
Return.
- Special indent for case label
- Enabling Special indent for case label tells Alpha to indent the case lines
inside a switch statement differently.
JavaScript in HTML mode
The JavaScript support in HTML mode is the same as in JavaScript mode,
except that there is no Special indent for case label preference,
and the Parse menu has another functionality in HTML mode. You might say that
between SCRIPT tags in an HTML document, Alpha behaves as if it were
is JavaScript mode.
CSS mode
CSS mode is intended for editing of CSS documents (suffix .css). To
manually switch to CSS mode select CSS in the mode menu in the
status bar. CSS mode provides dialogs for editing CSS properties as well as
keyword coloring, word completion, and the basic editing features,
indent on return, electric semicolon, and electric braces.
CSS in HTML mode
All CSS functionality in CSS mode is also available in HTML mode. You can
say that between STYLE tags in an HTML document Alpha behaves as if
it were in CSS mode.
Shared key bindings with HTML mode
The HTML element names can be used in the selectors in CSS. To save you key
strokes the key bindings for the HTML element can be used to insert the
HTML element names. For example, if you hit Ctrl-Cmd-Q (⌃⌘Q), which is the key binding for BLOCKQUOTE in
HTML mode, the text BLOCKQUOTE is inserted in the CSS document.
Whenever you change a key binding for an HTML element in HTML mode,
the corresponding key binding in CSS mode is changed.
CSS property dialogs
Most menu items in the CSS menu let you specify CSS
properties. What happens when you select such a menu item is the following.
First Alpha checks if there already are any values for the selected set of
properties. Let's say you have the following in your document
H1 {
    color: #123456;
    text-align: right;
}
and the current position is somewhere between the braces. If you now choose
Text from the CSS menu, Alpha first looks for all text properties
between the braces. In this case it would find text-align: right.
A dialog window is now opened where you can specify the various
properties. In the example, right will be the default value for
text-align as that was the value found. If Alpha finds something it
doesn't understand a warning message is displayed. Everything Alpha doesn't
understand will then be ignored.
When you have specified the values you want, they are inserted and
any old values are deleted, in the example text-align: right.
Because Alpha first inserts the new values and then deletes the old,
you may have use Undo more than ones to undo something.
The !important directive
In CSS it is possible to increase the weight of a declaration by adding
! important at the end, for example
H1 {
    color: #FF0000 ! important;
}
In the property dialogs, there is no way to say that a property should be
marked by !important, but if you make a change by using a property
dialog Alpha remembers which ones are important and marks the same
properties as important after the change.
The property dialogs
General things to note:
- When you specify a length or size, like for the font-size property, you can type
the unit in the textbox rather than selecting it in the menu (faster).
If you type a unit the one in the menu is ignored.
- In some cases there is a shorthand for a set of properties. Then
there are two checkboxes at the bottom of the dialog window.

Inherit all means that you give the value
inherit to the shorthand property and ignore the individual values.
Checking Use shorthand form if possible will
make Alpha try to express the properties using the shorthand. Otherwise
all individual properties are inserted into the document.
- For some properties, like margin, you can specify values for one or
two sides and let these values also apply to the other sides. For such
properties, there will be two radio buttons where you can choose if you
want to set the values individually or if you want the specified values to
also apply to the other sides.

Word completions in CSS
There is a clever word completion mechanism in CSS mode which saves you
keystrokes and time while typing. It also helps you to make sure no
properties are misspelt.
As explained on the previous page, you can use dialog windows
to edit CSS properties, but perhaps you prefer simply to type them. Then the
word completion mechanism can help you. Word completion is bound
to Ctrl-Tab.
Tip: If you prefer another key binding to Ctrl-Tab for word
completion you can change it using the menu item Alpha ↣ Global Setup ↣ Keyboard Shortcuts ↣ Special Keys.
How word completion works is best explained with examples.
When you are outside a pair of braces Alpha tries to expand what you have typed
to an HTML element. For example, if you type
blo
and hit Ctrl-Tab it is expanded to
BLOCKQUOTE
Continue by inserting a { and begin typing a CSS property
BLOCKQUOTE {
    vert
Hitting Ctrl-Tab expands this to
BLOCKQUOTE {
    vertical-align:
Continue by typing a few letters of the value of vertical-align.
BLOCKQUOTE {
    vertical-align: bas
Hit Ctrl-Tab and this is expanded to
BLOCKQUOTE {
    vertical-align: baseline
Many properties can either take a value from a list of possible values or
some other type of value. When completing, CSS mode tries to match against the
values in the list. For example marker-offset can either take the values
auto or inherit or a length. When completing the value for
marker-offset, CSS modes matches against auto and inherit.
When you're typing a URL it can also be expanded using the URL cache
(see the URL and frame target sets
section), and when you type a color it is matched against the color names.
CSS electrics
The term electric is used in the sense of automatic, power
assisted behavior, which is intended to save time, keystrokes, and
brainpower. All the electric features are features, which makes
Alpha do automatic typing for you. CSS modes electric preferences are set
using Preferences in the CSS menu.
- Electric braces
- Enabling Electric braces tells Alpha to treat the
left or right brace '{', '}' keys as special keypresses which enter the '{'
or '}' character, followed by a carriage return and then indent the
following line correctly. Note: for the electric braces
to work you must select your keyboard in the dialog
Alpha ↣ Preferences ↣ System Preferences ↣ International.
- Electric semicolon
- Enabling Electric semicolon tells Alpha to treat
the semicolon key ';' as special keypresses which enters the ';' character
followed by a carriage return and then indents the following line
correctly.
- Indent on return
- Enabling Indent on return tells Alpha to indent the following
line automatically whenever you press return.
Shift-Command-double-clicking
Shift-Command-double-clicking on a CSS property
Shift-Command-double-clicking on a CSS property opens a dialog box, where you can
edit the value of the property.
Shift-Command-double-clicking on a URL attribute
Shift-Command-double-clicking on an absolute URL sends the URL to your web
browser. This is not limited to CSS mode. It is a general feature of
Alpha.
Shift-Command-double-clicking on a relative URL attribute opens a new
window with the file if the file exists and is a text file. If it does not
exist, a dialog box appears as the one shown below. As you see, a new empty
window can be opened with the name of the file. This window is
automatically saved in the right place, and if necessary new folders are
created. Thus, if you are making a new set of pages, you can make links to
the ones you have not written yet and then, by shift-cmd-double-clicking, let
Alpha make empty files which are saved where you want them.
Parse menu
The Parse popup menu of the document window displays the list of all
selectors in your file. You can then easily jump to a selector by selecting
it in this menu.
Reload in browser
The function Reload in browser reloads the frontmost window in your
browser. The idea is that if the frontmost window in the browser uses the
style sheet you are editing, so you can quickly reload the page to see the
effect of your changes to the style sheet. Reloading the page currently
works with Netscape, Internet Explorer, Mozilla, Opera, Safari, and iCab.
CSS preferences
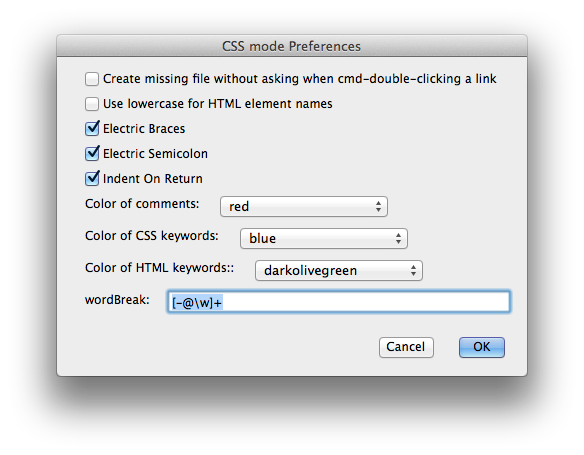
- Create missing file without asking when cmd-double-clicking a link
- If checked and you shift-cmd-double-click a link pointing to a file which does
not exist, Alpha will create an empty file and open it without first asking
you if you want to create the file. By default you are asked before the
file is created. This setting is synchronized with the same setting in HTML
mode.
- Use lowercase for HTML element names
- If checked, Alpha will insert HTML names in lowercase when you use the key
binding for an HTML element, or when you use word completion to complete an
HTML element name. By default uppercase is used.
- Electric Braces, Electric Semicolon, Indent On Return
- See the CSS electrics section.
- Color of keywords
- The color of keywords in CSS. The default is blue.
- Color of comments
- The color of comments. The default is red.
- Color of HTML
- The color of HTML elements. The default is magenta.
- wordBreak
- This controls which characters build up words. Do not change it unless you
know what you are doing.
Power user
Defining your own formatting tags
In the Formatting menu there are two items for inserting formatting
tags. You can also define your own formatting tags by defining procs for
how the text should be indented within the tags. Let us say you want to
define formatting tags called MY-SCRIPT-FORMATTING.
First write a proc which correctly indents a line inside MY-SCRIPT-FORMATTING tags:
proc myScriptIndent {} {
    code goes here
}
Then you can optionally define a proc for reformatting a region of text. By
default the proc ::indentRegion is used, which simply indents line after
line in the region. If you need a more sophisticated reformatting write a
new proc:
proc myScriptIndentRegion {} {
    code goes here
}
Then finally you register it by adding a line of the for
html::RegisterFormattingStyle "style" "menu item text" "indent line proc" "reformat region proc"
to your HTML preferences file. When you are in HTML mode, open it using the
menu item
Alpha ↣ HTML Mode Setup ↣ Edit Prefs File.
Let us say that in this case you want the menu item text
"My Script Formatting". Then the instruction would be
html::RegisterFormattingStyle "MY-SCRIPT-FORMATTING" "My Script Formatting" "myScriptIndent" "myScriptIndentRegion"
Optionally you can omit the last argument if you have no special
reformatting proc:
html::RegisterFormattingStyle "MY-SCRIPT-FORMATTING" "My Script Formatting" "myScriptIndent"
References
Here are some useful links concerning the HTML, XHTML and CSS languages:
Known problems
Please report any problem or bug you encounter in
Alpha's Bug Tracker.
All comments on HTML mode are welcome. Many features in HTML mode
were suggested by HTML mode users. Don't hesitate to send your ideas.
License and Disclaimer
- Copyright (c) 1996-2004, Johan Linde
- Copyright (c) 2005-2020, the Alpha Community
All rights reserved.
The HTML and CSS Modes package is free software and distributed under
the terms of the new BSD license:
Redistribution and use in source and binary forms, with or without
modification, are permitted provided that the following conditions are met:
- Redistributions of source code must retain the above copyright notice,
this list of conditions and the following disclaimer.
- Redistributions in binary form must reproduce the above copyright notice,
this list of conditions and the following disclaimer in the documentation
and/or other materials provided with the distribution.
- Neither the name of the Alpha Community nor the names of its contributors
may be used to endorse or promote products derived from this software
without specific prior written permission.
THIS SOFTWARE IS PROVIDED BY THE COPYRIGHT HOLDERS AND CONTRIBUTORS
"AS IS" AND ANY EXPRESS OR IMPLIED WARRANTIES, INCLUDING, BUT NOT LIMITED
TO, THE IMPLIED WARRANTIES OF MERCHANTABILITY AND FITNESS FOR A PARTICULAR
PURPOSE ARE DISCLAIMED. IN NO EVENT SHALL THE ALPHA COMMUNITY BE
LIABLE FOR ANY DIRECT, INDIRECT, INCIDENTAL, SPECIAL, EXEMPLARY, OR
CONSEQUENTIAL DAMAGES (INCLUDING, BUT NOT LIMITED TO, PROCUREMENT OF
SUBSTITUTE GOODS OR SERVICES; LOSS OF USE, DATA, OR PROFITS; OR BUSINESS
INTERRUPTION) HOWEVER CAUSED AND ON ANY THEORY OF LIABILITY, WHETHER IN
CONTRACT, STRICT LIABILITY, OR TORT (INCLUDING NEGLIGENCE OR OTHERWISE)
ARISING IN ANY WAY OUT OF THE USE OF THIS SOFTWARE, EVEN IF ADVISED OF THE
POSSIBILITY OF SUCH DAMAGE.